
While taking attendance may be a chore, it can be beneficial for getting to know your students’ names and making connections. Attendance can also be an indicator that a student is struggling with the course content as well as one of the best predictors of student success.
The Review of Educational Research journal found attendance was a better predictor of college grades compared to other predictors like standardized admissions tests, high school GPA, and study habits and skills.
By consistently taking attendance—and even making the final grade reflect attendance—you can improve classroom participation and student retention. Alternative ways to take in-person attendance, like feature, help instructors streamline this once tedious process. Let’s take a look at some of the different ways you can effectively check who’s in class and who’s not.
4 automated ways to take attendance in college courses
1. Automate check-ins with Attendance Management
With Poll Everywhere's Attendance Management feature, taking onsite attendance is instant and automatic. Now you can dive right into class instead of filling out a spreadsheet or checking off names on a list.
The feature uses geolocation to track students’ attendance. The instructor sets geofenced attendance locations that correspond with where they’re hosting class, then invites students to check in for a fully automated process.
This means students are only marked present if they check in from the locations set in the Attendance Management options, reducing the risk of faked attendance and participation.
Pro tip: If your class is longer or includes breaks, try this strategy: Require students to check in at the beginning of class using Poll Everywhere. Then end class with a short quiz so you can see who came to class—and stayed.
2. Send out an icebreaker question with Poll Everywhere
Why not turn attendance into a relationship-building activity? Poll Everywhere lets you easily share icebreaker questions with your class, who can then respond directly from their cell phones. When you enable the Attendance Management feature in Poll Everywhere, students are asked to share their location to check in and participate in the poll.
If you need some help getting started, try these icebreakers out:
- What’s one thing you hope to learn this semester?
- What did you do on summer vacation?
- What’s one hobby or skill you’re proud of?
- What’s your favorite book or movie?
Once you've sent out your question, give students a few minutes to check in and respond. You could also take this activity a step further and ask each student to share their answer. This helps your students get to know each other and creates a more positive and engaging learning environment.
Did you know? You can get creative while you take attendance using Poll Everywhere’s teaching tech.
3. Start class with a quiz
Quizzes are a great way to gauge each student’s comprehension of the course materials, and they can also help you take attendance.
Start your class by sending students a multiple-choice quiz in Poll Everywhere. The questions you choose can be based on recent homework, readings, or concepts taught in class.
Additionally, you can use the Attendance Management feature to streamline tracking attendance and participation. Once you invite students to participate in the quiz, they can mark themselves as present by sharing their location.
4. Ask a question about previously assigned homework
If you assign homework on a regular basis, you can use it to take roll as well.
One way to do this and invite student participation—as well as check for understanding—is to send out an open-ended question about the topic or skill students encountered in their homework.
Once you invite students to participate by submitting a response, they’re prompted to share their location to check in and mark themselves as present. Talk about “two birds with one stone.”
Expert tip: Slack and other tech tools make asynchronous classroom communication easy. Check out our favorite apps for teachers for ideas on how you can implement technology in your classroom.
How to set up Poll Everywhere to track attendance in your LMS
Technology like Poll Everywhere can play the role of teaching assistant and tackle tasks like attendance for you. Here’s how to set up Poll Everywhere to automatically log attendance in your LMS.
Step 1: Import your class roster into Poll Everywhere
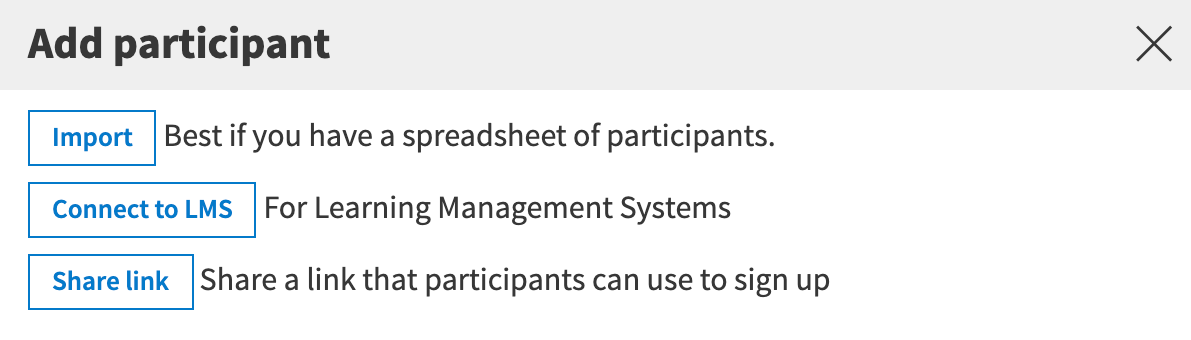
There are three different ways to add your students’ names to Poll Everywhere:
- Connecting to your LMS: Once your LMS is connected, you can import your student roster to Poll Everywhere, which creates a participant account for all your students.
- Importing a .CSV file: By creating a .CSV file with your students’ information and importing it to Poll Everywhere, you can then send out emails with login instructions.
- Sharing a link for students to add themselves: Be sure to remind students to use their university email to ensure their participation and information are correctly logged by Poll Everywhere.
Step 2: Set your account to require registration
Once your list of students is successfully added to Poll Everywhere, you can then require registration for certain activities, including attendance and graded quizzes.
To do this, click on the gear icon in your Poll Everywhere account and then choose Account Admin to open the settings menu. Next, check the box next to “Restrict to registered participants” to require registration for your Poll Everywhere activities.
Why should you require registration? By making sure students sign in before participating in Poll Everywhere activities, you ensure they get credit for their participation—and for attending class. Watch our webinar for a visual walkthrough showing you how to require registration in Poll Everywhere.
Step 3: Organize your student rosters
After adding your student roster to Poll Everywhere and setting up your account to require participant registration, you can organize students into groups. We recommend organizing students by course, but you may also choose to group them by semester, year, or another quality.
Step 4: Enable Attendance Management
You can enable Attendance Management in two ways:
- Go to your Activities Dashboard and click on the Attendance Management tile
- Navigate to your profile in the bottom-left, then click on Attendance Management
Once you’ve opened the Attendance Management settings, click the toggle to enable the feature. If you haven’t already, add your preferred check-in location using the map.
Step 5: Create your attendance activity
You’ve added your roster, your students have registered, and you’ve set up Attendance Management—the hard part’s done. Now, you get to be creative and create your attendance activity.
When setting up your activity, we recommend using it as a comprehension check as well. Poll Everywhere’s quizzes, polls, and Clickable Images help you pose thoughtful questions and track student responses so you can spot anyone who’s falling behind before it’s too late.
Learn more: Get a step-by-step walkthrough on how to create an attendance activity and present it with Google Slides, PowerPoint, or other software.
Step 6: Share your activity in class
Kick your class off with your attendance activity. This also prompts students to mark themselves as present by having them verify their location.
Attendance Management uses geolocation to prevent students from faking attendance, and its automated approach lets you focus on teaching rather than juggling a spreadsheet or slip of paper.
Additionally, Attendance Management lets you pull attendance and participation data to get a full view of your classroom engagement metrics. With these reports, you can see how attendance impacts student participation—and even export your attendance report as a CSV file and import it to your LMS.

Bonus tips to help you take attendance
Taking attendance isn’t always clear-cut, so we’re sharing a handful of extra tips to help you make it as easy as possible.
- Use attendance as a way to encourage student participation by combining it with active learning strategies that foster group discussion and critical thinking skills.
- Create a countdown timer inside Poll Everywhere and set it for 30 to 45 seconds. Once the timer runs out, the attendance activity automatically locks, and no further responses can be added.
- Open class with an icebreaker or quiz—Poll Everywhere’s Attendance Management feature automatically prompts students to check in and mark themselves present. Additionally, you can end class with another activity and track participation to discourage students from simply walking into class and leaving after checking in.
Use Poll Everywhere to take attendance automatically
While taking attendance may be time-consuming and tedious, there are strategies and tools you can use to simplify and speed up the process.
Using tech tools like Poll Everywhere allows you to quickly and easily take roll in a way that’s fun and engaging for your students. Automate the process with Attendance Management , send out an icebreaker question, create an attendance activity, or quiz students with our app—you decide which approach works best for you. Get started today by creating a Poll Everywhere account.