
This blog will demonstrate how easy it is to enhance hybrid work experiences with the new Webex Embedded App Framework, app platform, and publishing portal. We will share steps to take advantage of the Webex platform by building a fully functioning web app. It will be built from the ground up using the latest version of Ruby on Rails, Web Components, Webex JavaScript API, and Heroku hosting. After following these instructions, you will have a Webex prototype app and exposure to modern tech paradigms to quickly test out your hybrid work experience ideas in Webex.
Introducing our app inside Webex Meetings
Poll Everywhere has been exploring and supporting hybrid work from the very start. Half of our company has worked remotely over the past decade. We feel uniquely qualified to help companies connect a workforce from all parts of the world through platforms like Webex.
This integration and partnership with Webex bring us another step closer to fulfilling our company mission: to make meetings more inclusive.
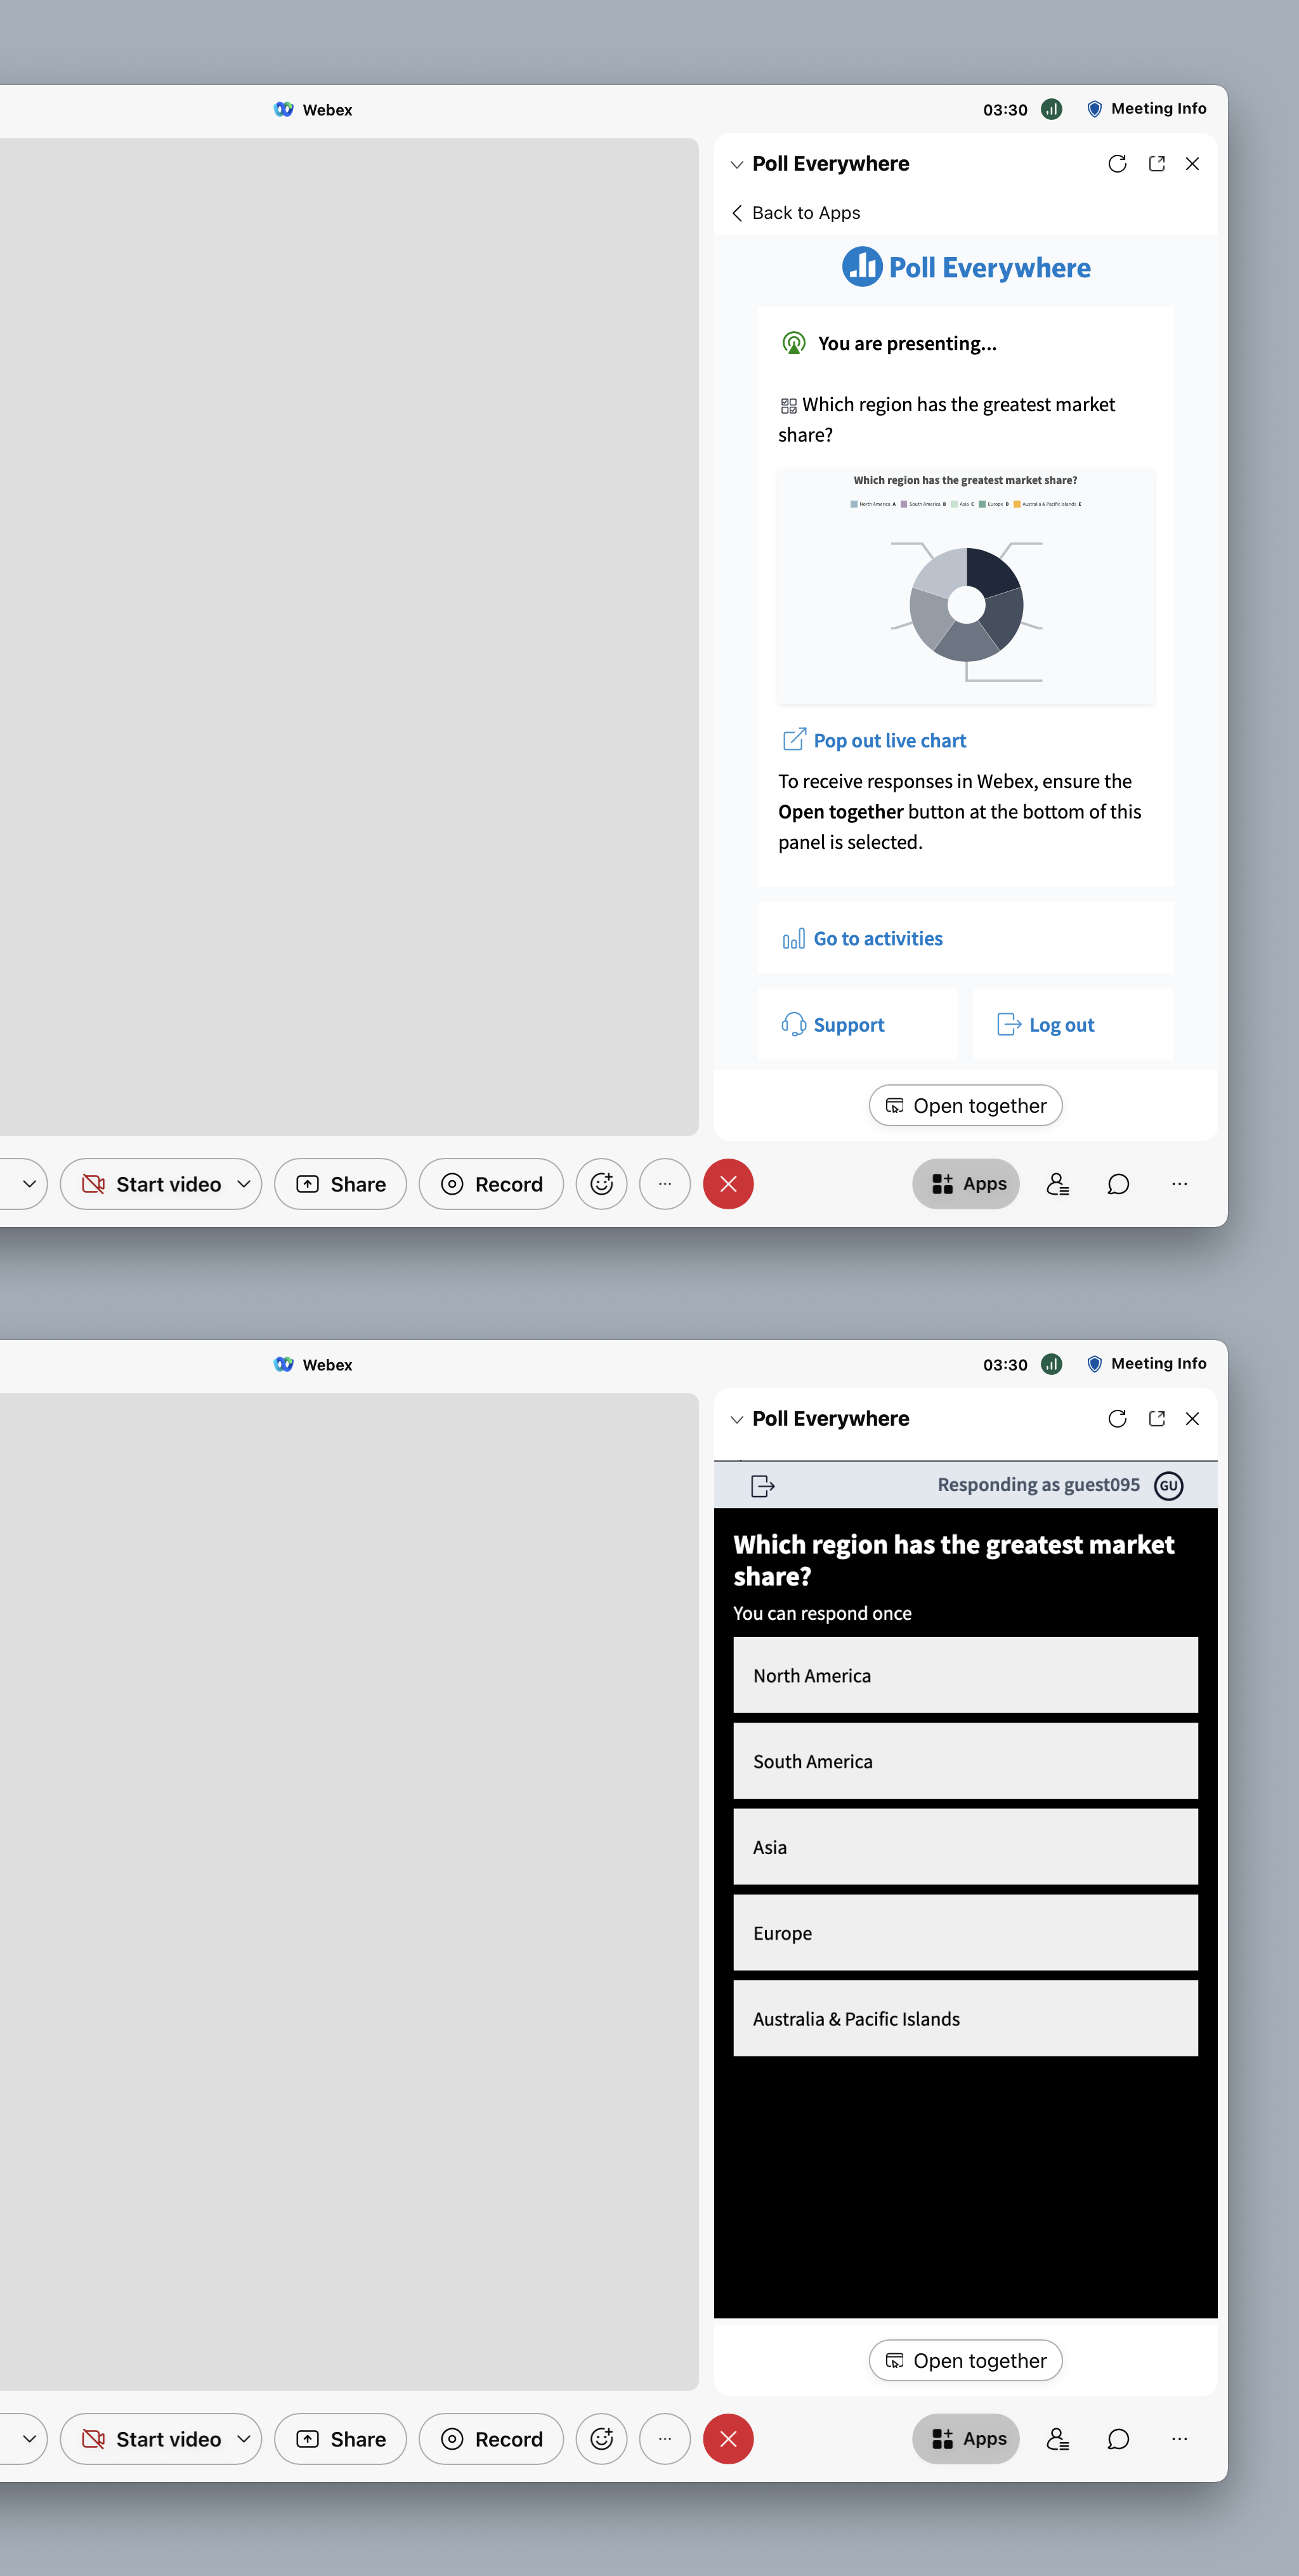
The Poll Everywhere for Webex app seamlessly lets meeting hosts create and present multiple choice questions and engaging competitions all within a Webex meeting. To accomplish this, our team created a new Poll Everywhere dashboard experience. It helps a host quickly access Poll Everywhere within Webex and engage attendees in a remote meeting from one spot.
Our app shares activities directly with the attendees in a Webex meeting through the Webex Embedded Apps Framework API feature called “Open together.” Attendees will be familiar with the screen they “Open together” with the host because it is the same Pollev.com site they will have previously participated in.
Try out our app within Webex Meetings or learn more by visiting the Webex App Hub page.
We suggest you head on over to Webex’s developer portal to learn more about the Webex Embedded App Framework SDK.
How we did it
Throughout this post, we will demonstrate how to develop an app integration for Webex. Our goal will be to build an app that relies heavily on the “Open together” Webex API feature. To take full advantage of this feature, we will need to glue several technologies together.
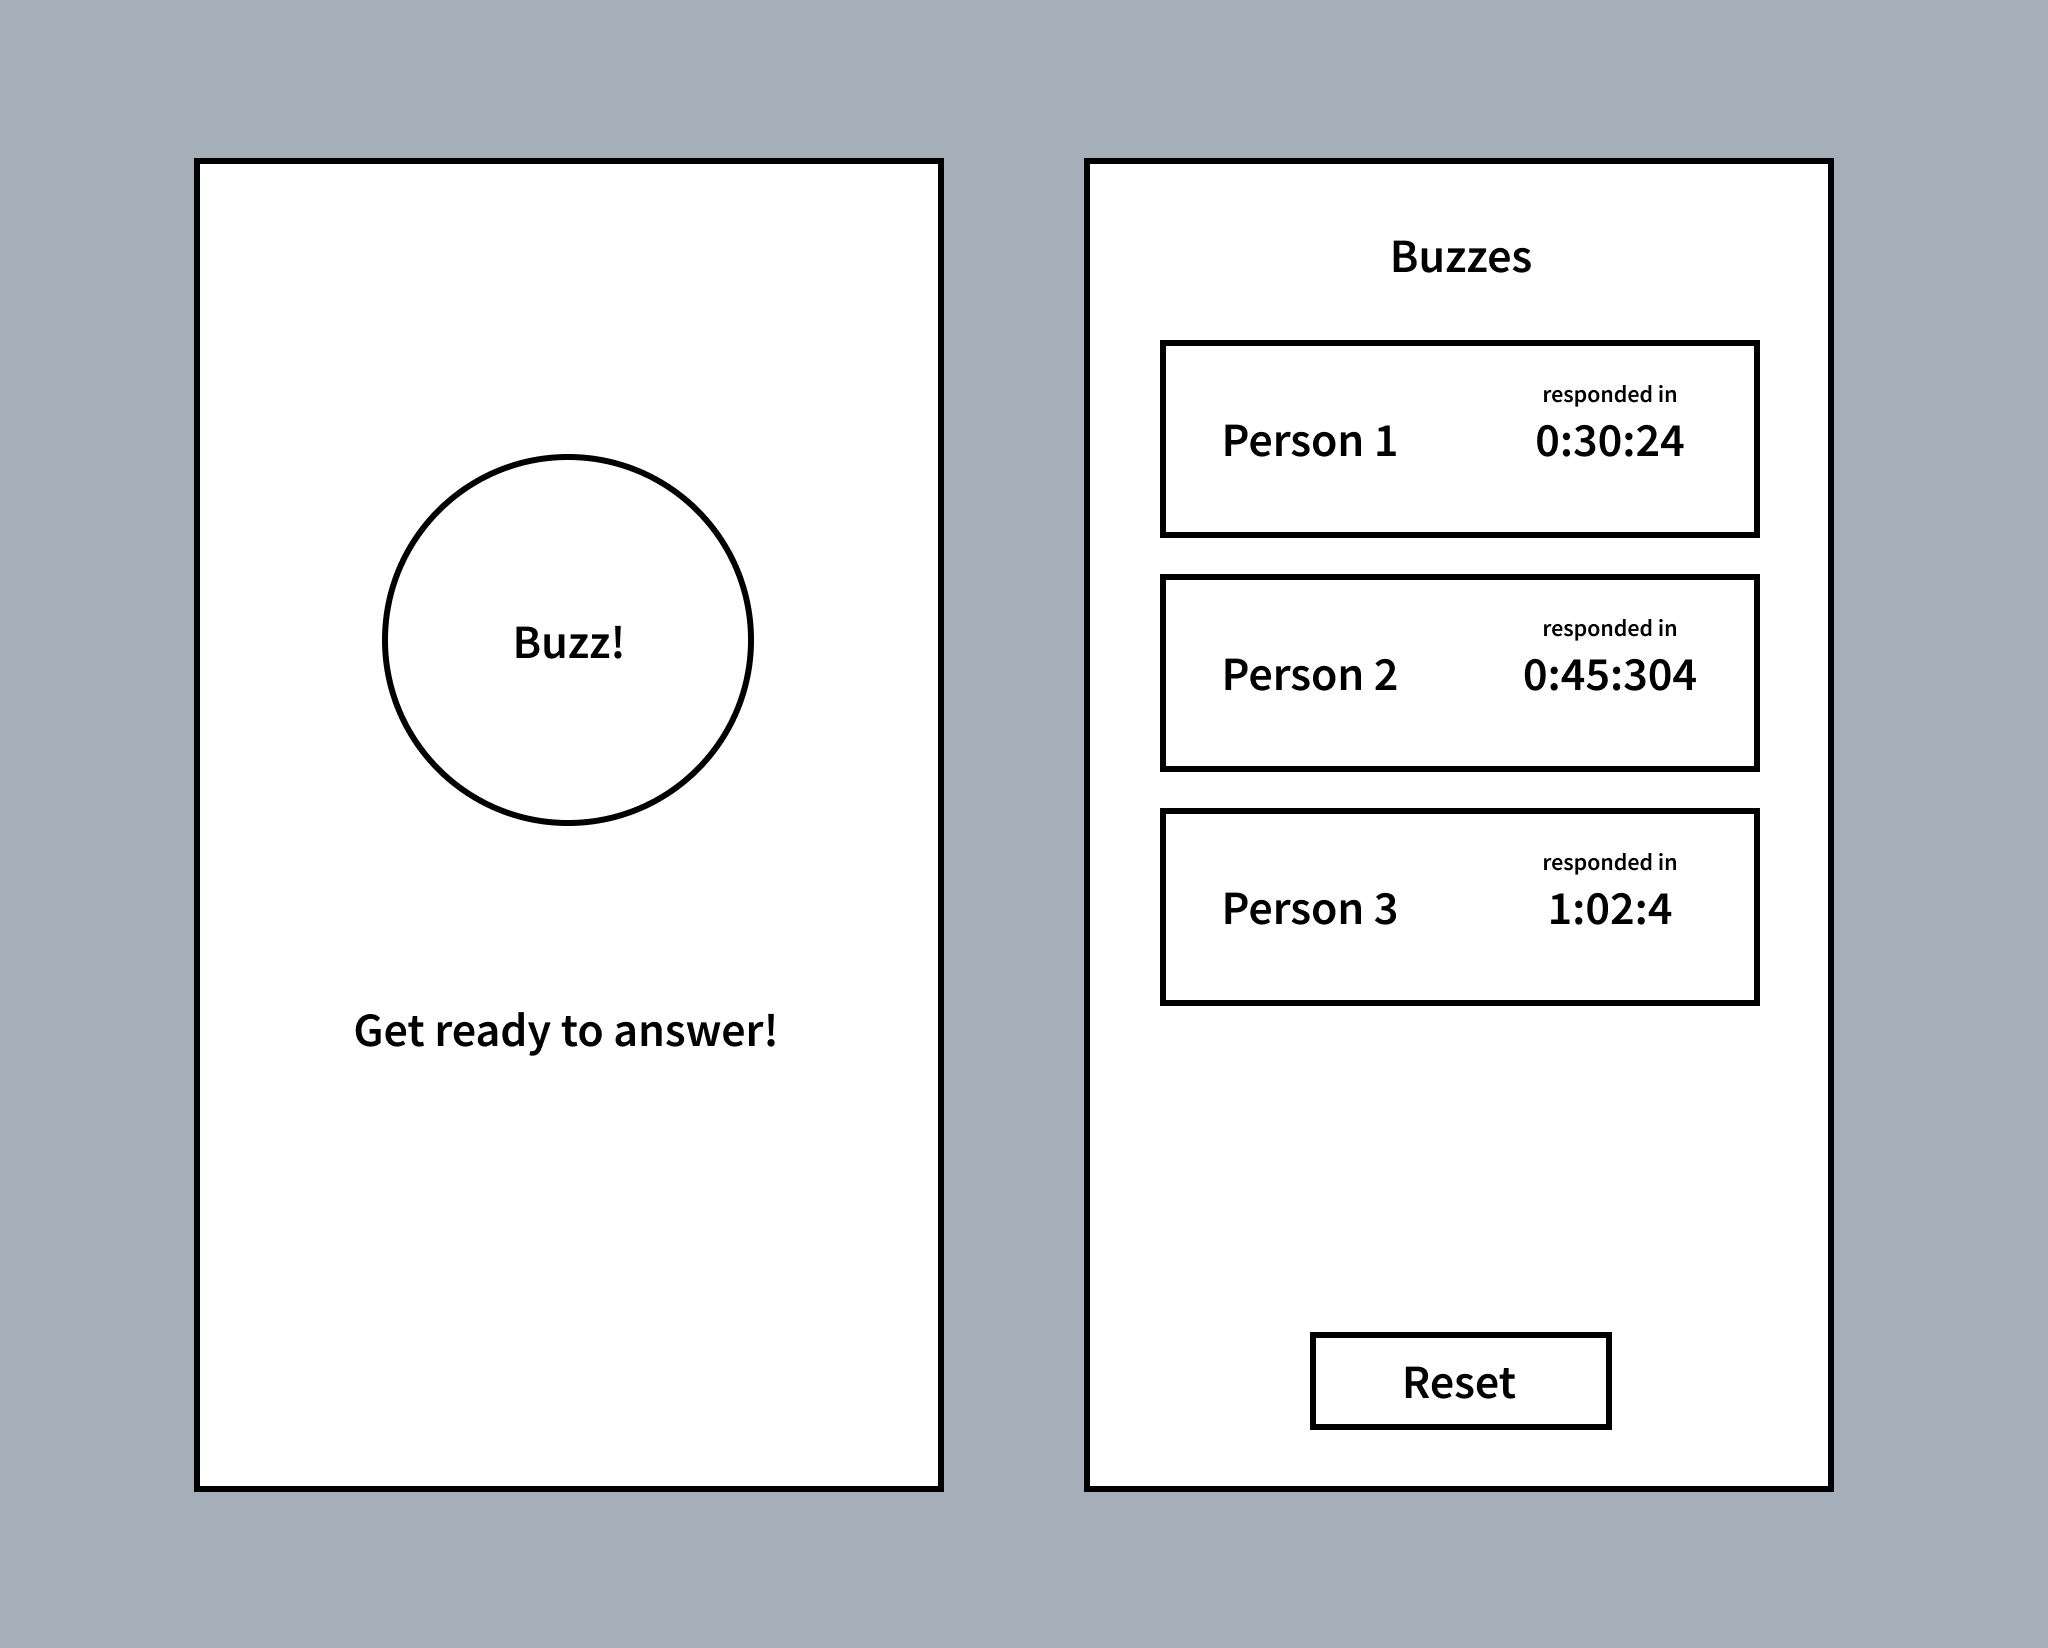
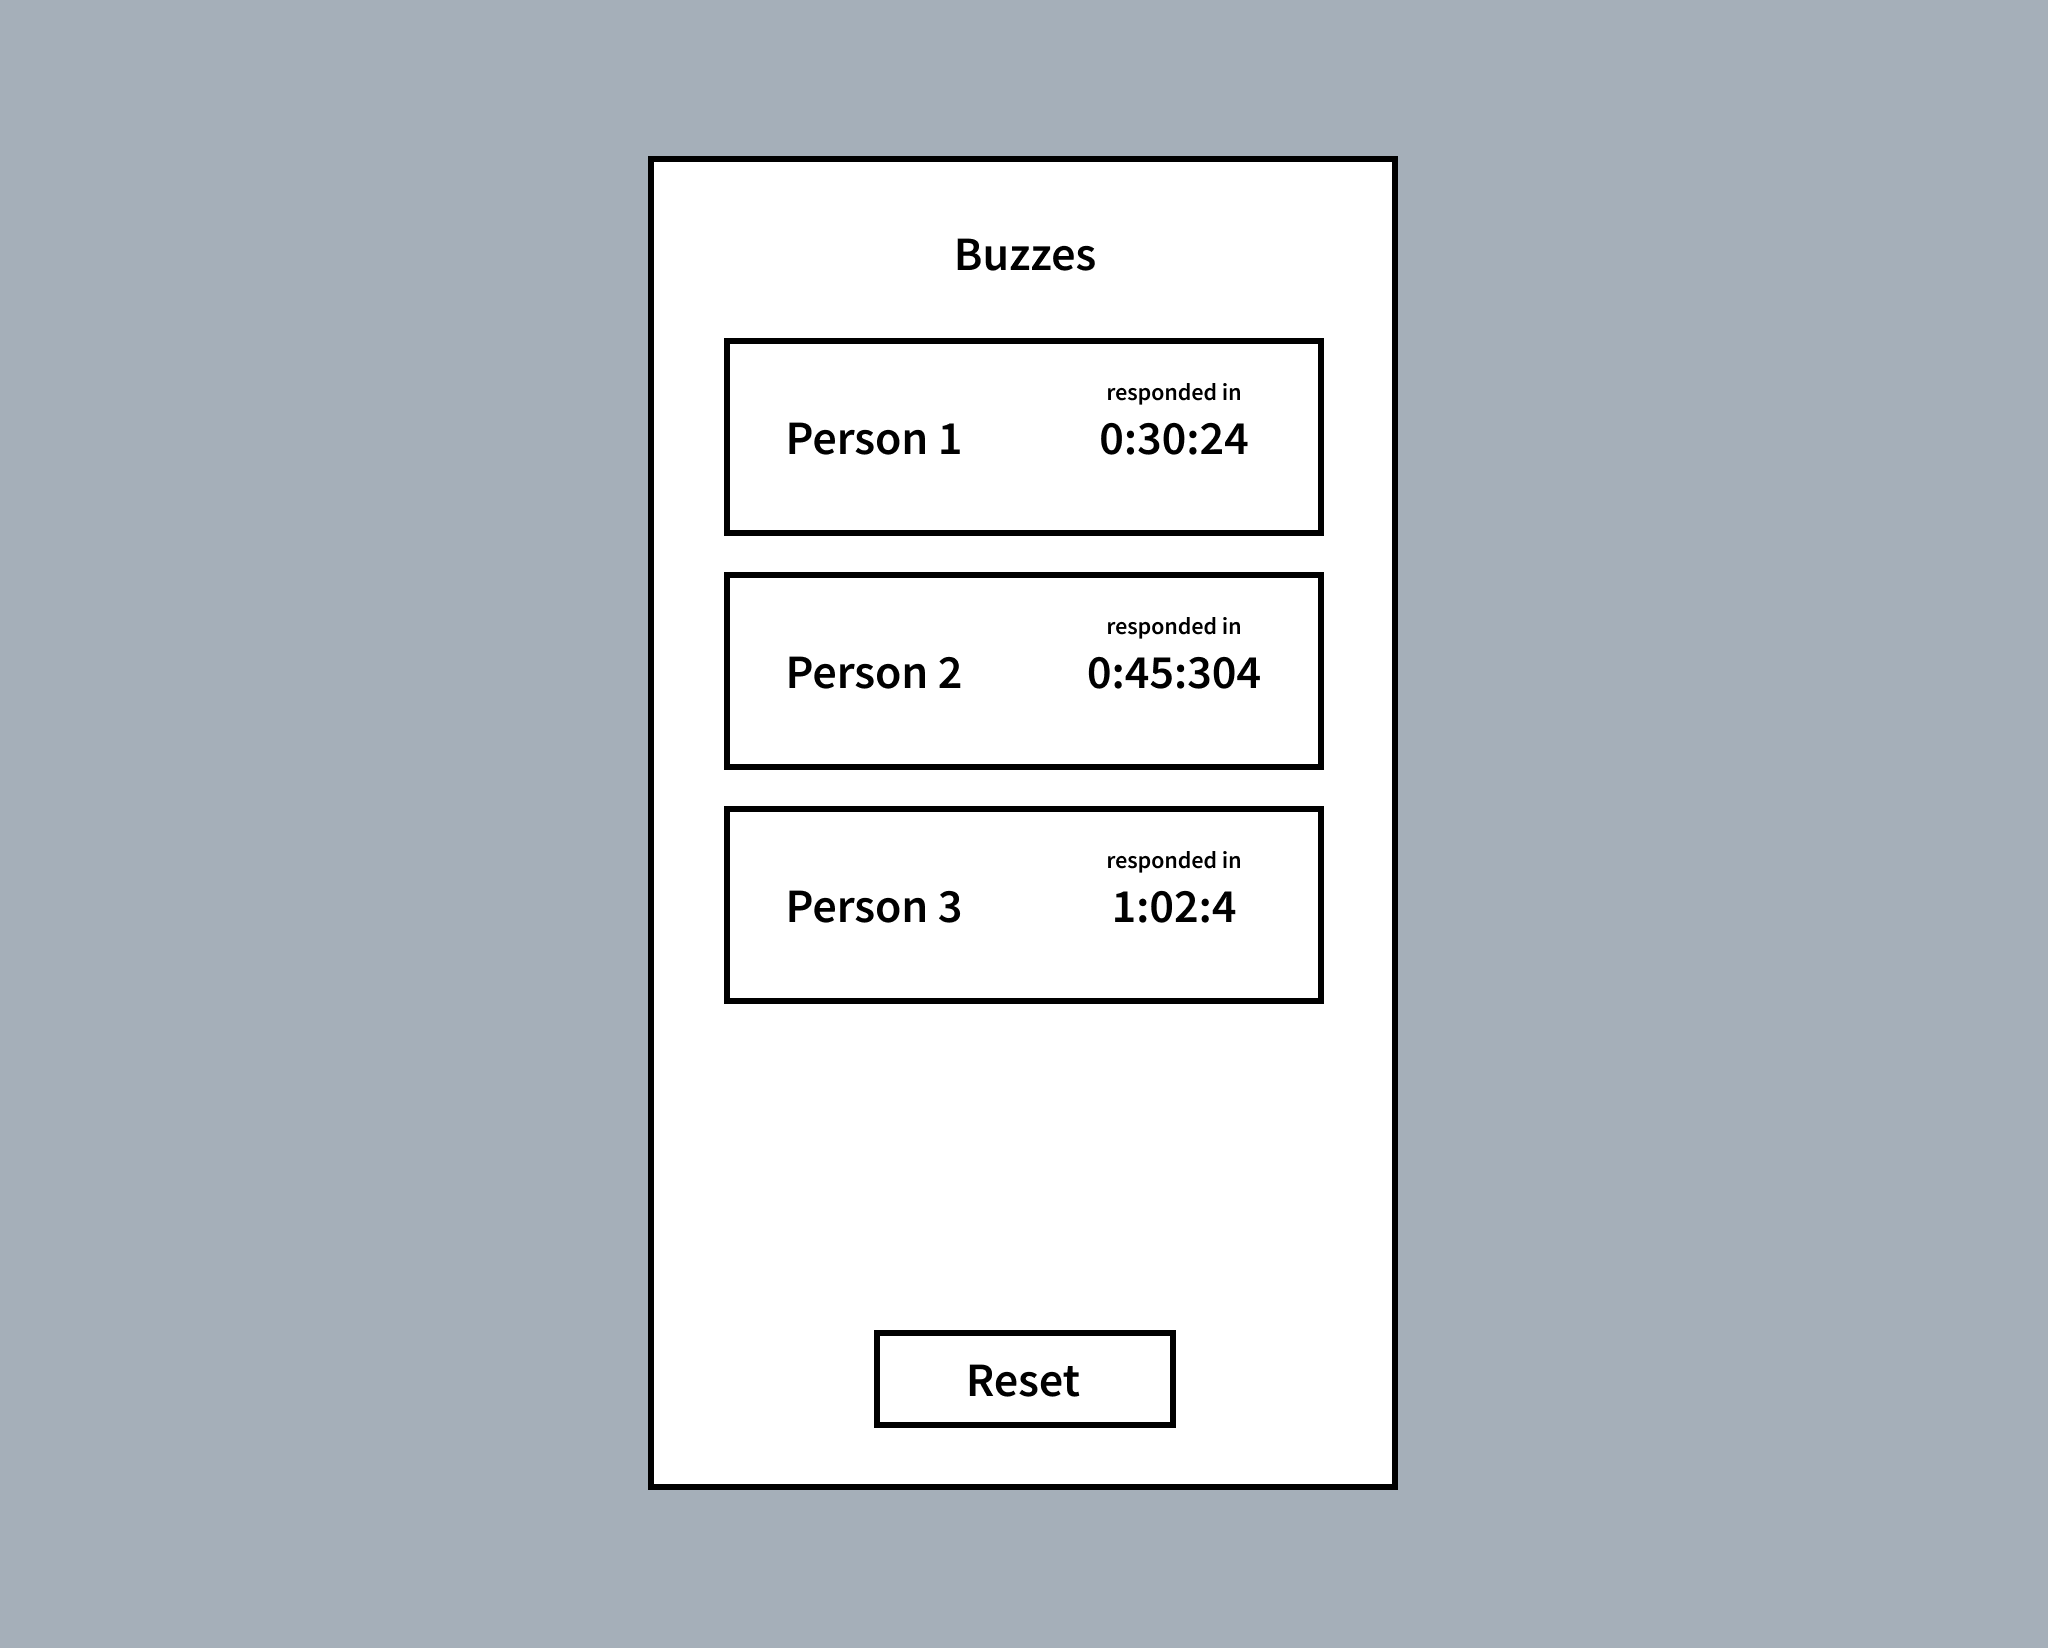
We will create a simple Jeopardy-like app that lets attendees play a game with their host. It will let attendees press a “Buzzer” button after a host asks a question, and the host will instantly see a list of those attendees who have pressed (“buzzed”) the button in chronological order. The host will then know who pressed the button first and who is first in line to answer the question they’ve asked.
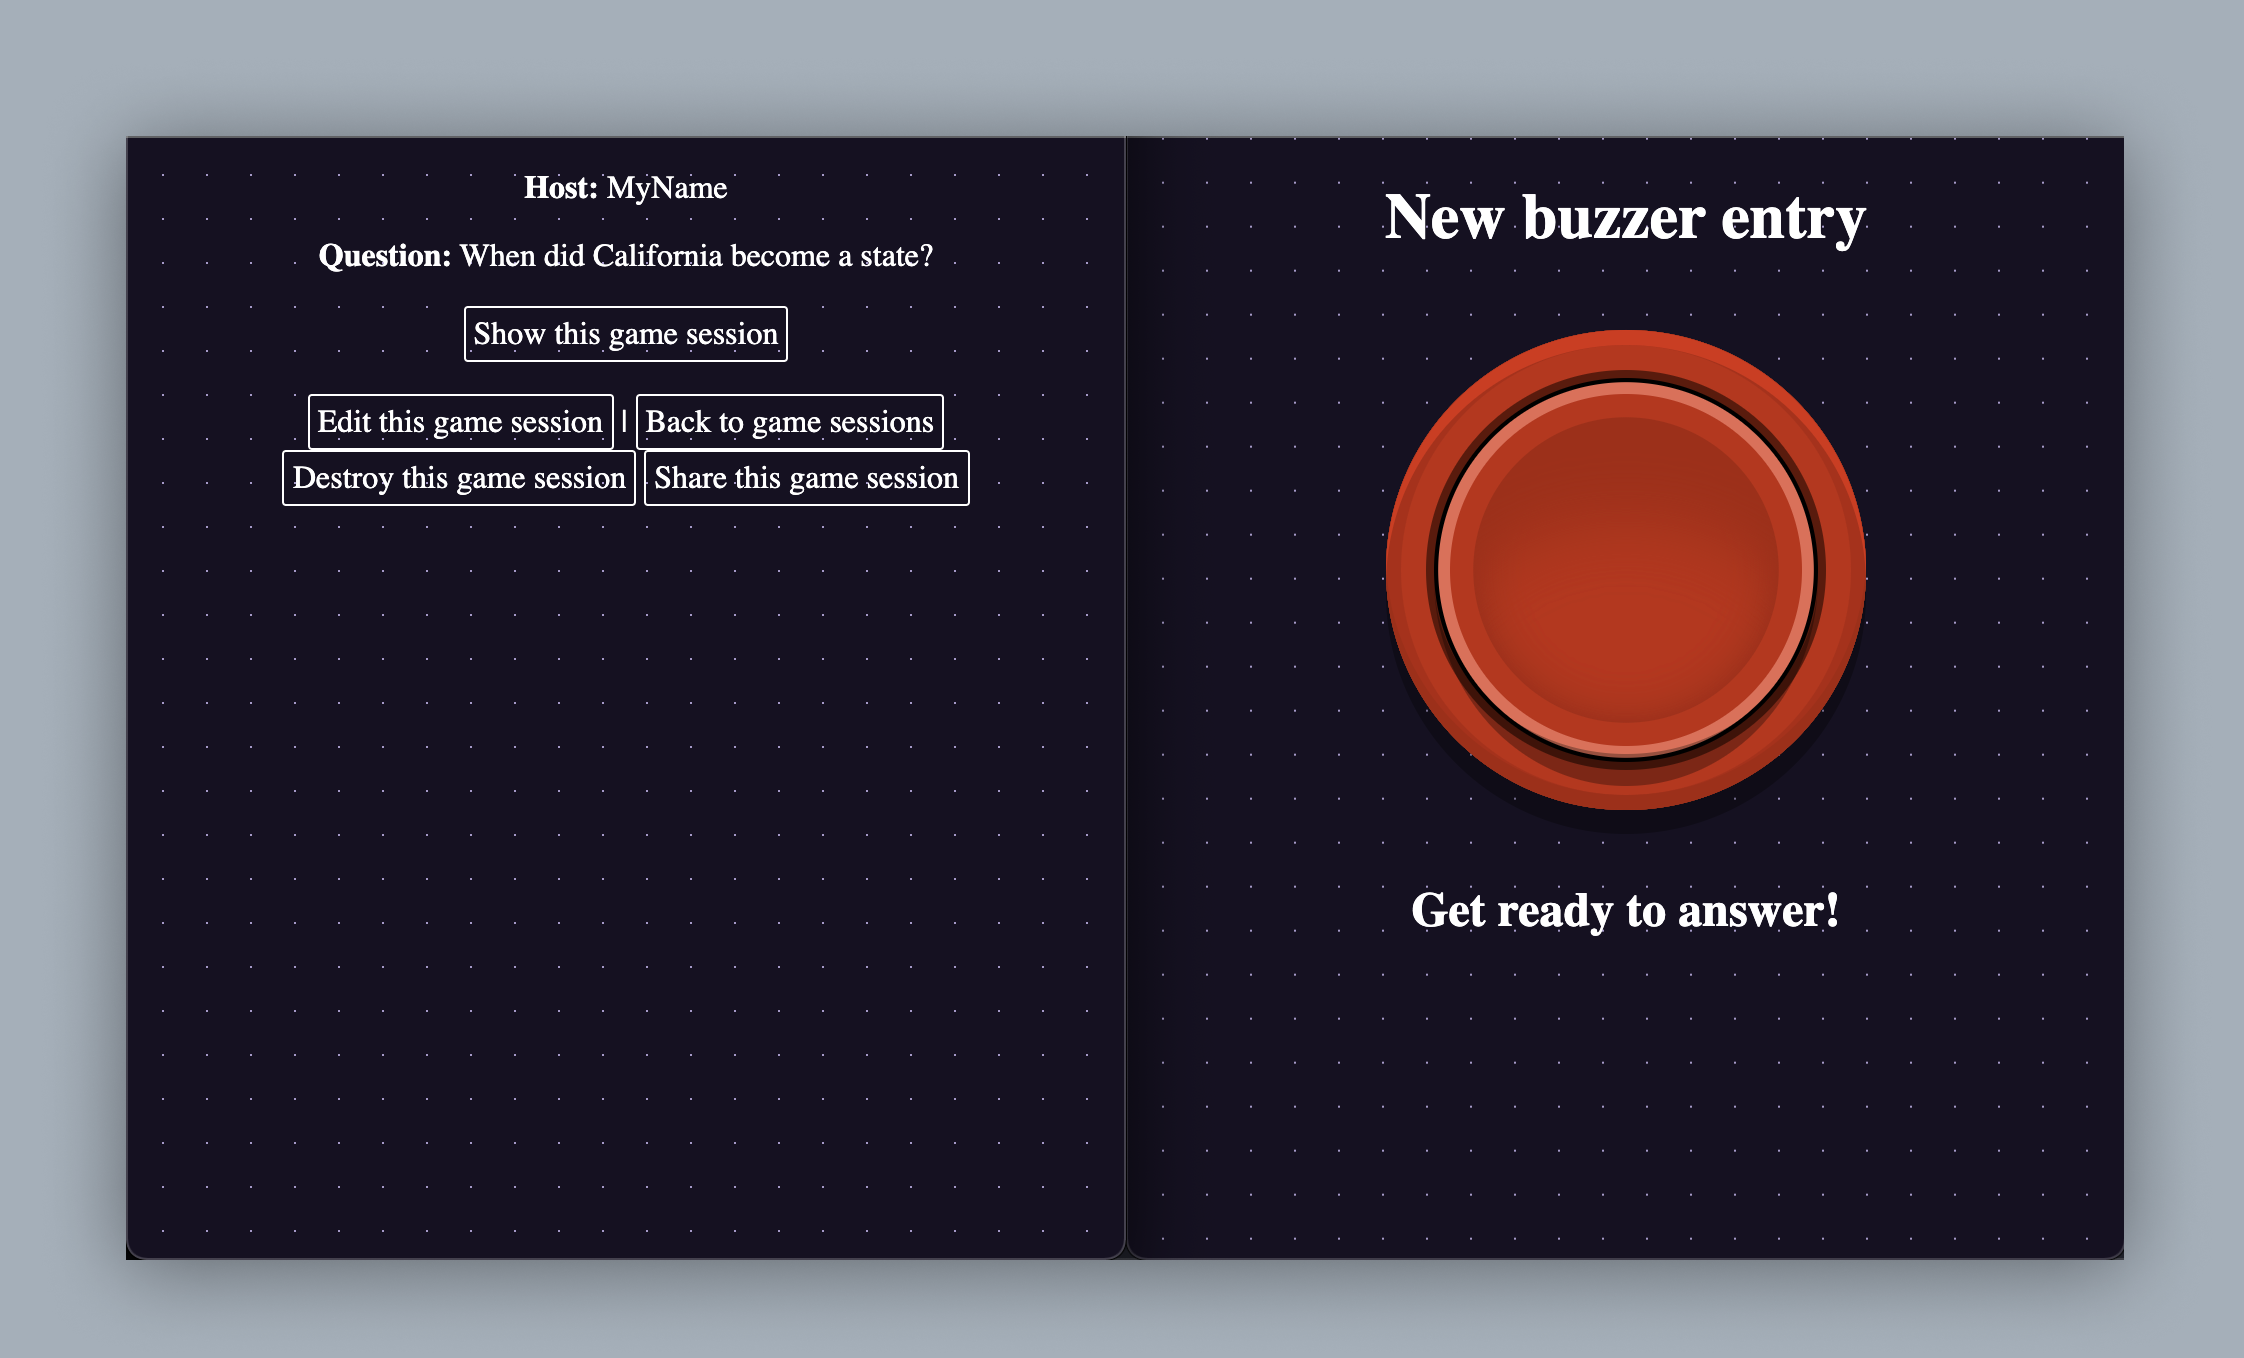
Here is a rough design of the app:
Pre-requisites
Here is a list of requirements that you will need to have set up before starting this tutorial.
- Ruby on Rails Edge installed
- Heroku account and repository setup
- Postgresql installed
- Familiarity with Web Components
- Familiarity with LitElement
- Webex developer account
Buzzer app
Before starting, we need to install the latest alpha version of Ruby on Rails. This tutorial was written using version 7. If you would prefer to install it for your specific project, then we recommend updating your Gemfile accordingly. Open your preferred Terminal application and run the following command to install Ruby on Rails globally:
gem install rails -v 7.0.0.rc1We chose to demo an alpha version of Ruby on Rails because version 7 introduces a big philosophical paradigm shift. It is called HTML-over-the-wire (also known as HOTwire). This architectural approach greatly reduces the number of moving parts in a classic web application and allows us to build a snappy UI without the need for a heavy REST API or strong front and back-end boundaries. This tech is perfectly suited for integrating with Webex.
Postgresql will be used to store state because it is the preferred Heroku database. Make sure you have started the postgresql service after installing it locally with brew services start postgresql.
Now, create the app with:
rails new buzzer_Webex_app --database=postgresql
Next, create the database user for our app with the following command. Our app will connect to the postgresql database with this user, see config/database.yaml.
psql postgres -c "CREATE ROLE buzzer_Webex_app; ALTER ROLE buzzer_Webex_app CREATEDB LOGIN;"
After that succeeds, install the Ruby on Rails dependencies with:
bundle install && rails importmap:install turbo:install stimulus:install
Note: If asked to overwrite a file select “Yes.”
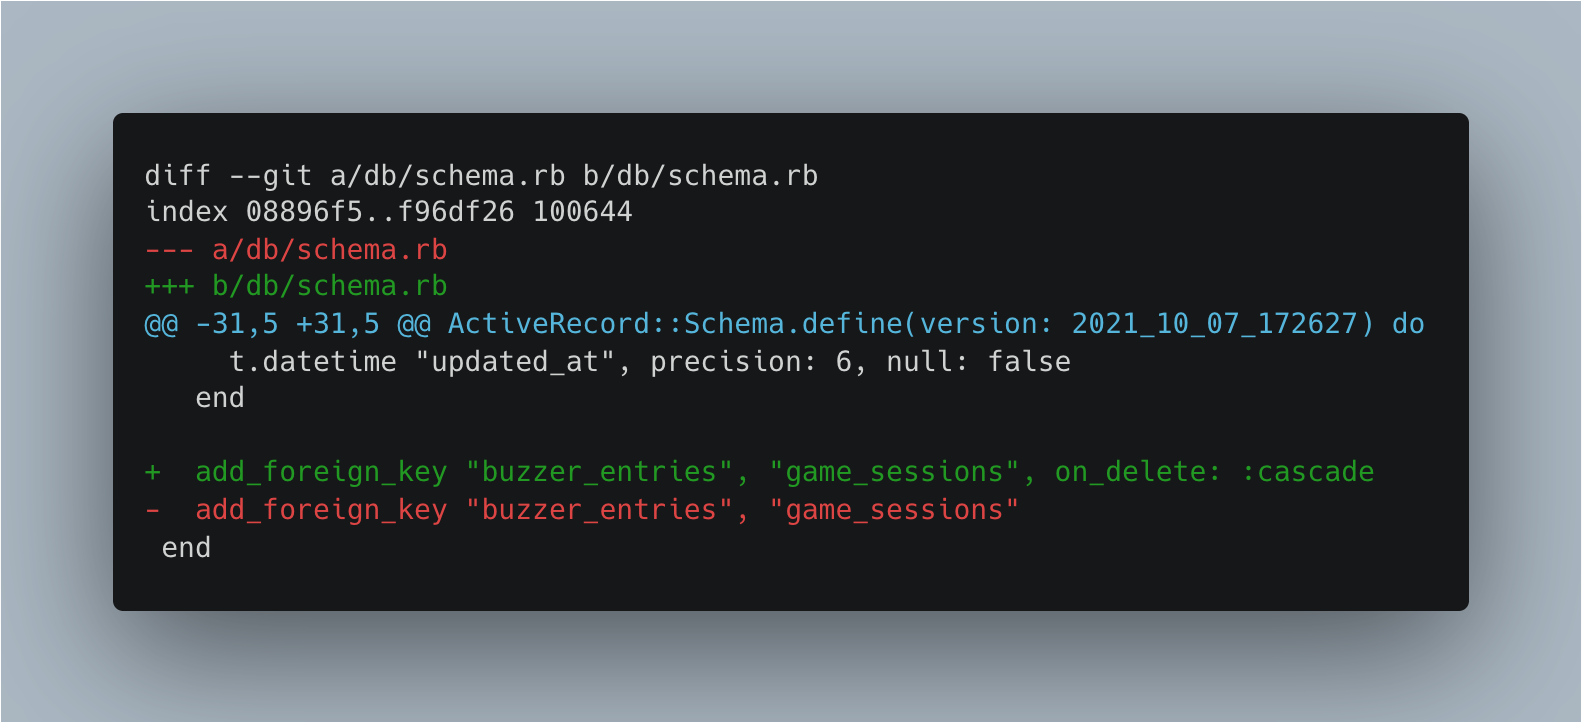
We need a GameSession that represents the current question that a host intends to ask. The GameSession should have many BuzzerEntries to associate attendees who “buzzed” with an answer to the question asked. The BuzzerEntry should store the attendee’s name and the moment they “buzzed” so we can determine who “buzzed” first. Generate the scaffolding with the rails CLI generator utility:
rails g scaffold game_session host:string question:string
rails g scaffold buzzer_entry attendee:string stopwatch:integer game_session:references
After it is generated, manually add the cascade constraint to the migration so deleting a GameSession also deletes the BuzzerEntry associated with it.
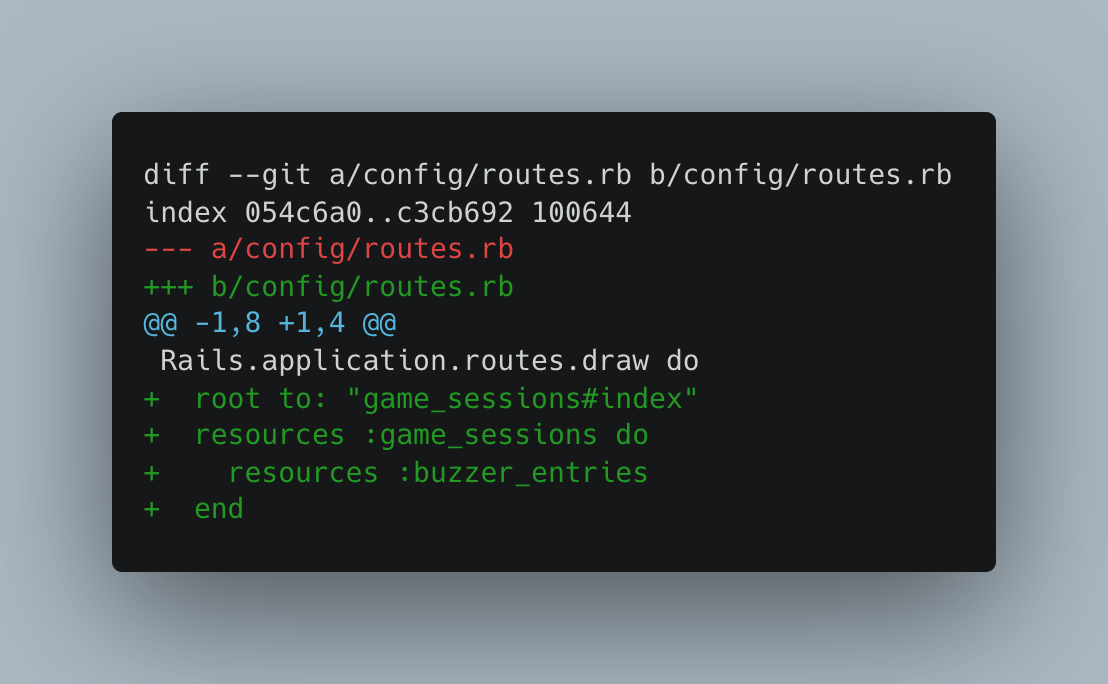
Set the root view to the GameSession index in routes.rb.
We now have everything in place to construct our database. Run:
rails db:setup

rails db:migrate
This is the first logical stopping point because:
- We have our basic project structure setup
- And, we have our data model defined
Commit these changes to the repository.
git add . && git commit -m “Buzzer app initial structure”
The next step is to integrate Ruby on Rails HTML-Over-The-wire (HOTwire) by adding TurboFrames to the app’s views. TurboFrames denote where Rails HOTwire will run. When we wrap sections of our view with a TurboFrame, Rails will update only this frame of the view on any future CRUD operation. Ruby on Rails controllers will do all of this automatically for us.

We can start a local server to test out the changes made from here on out by running rails start.
Introducing TurboFrame
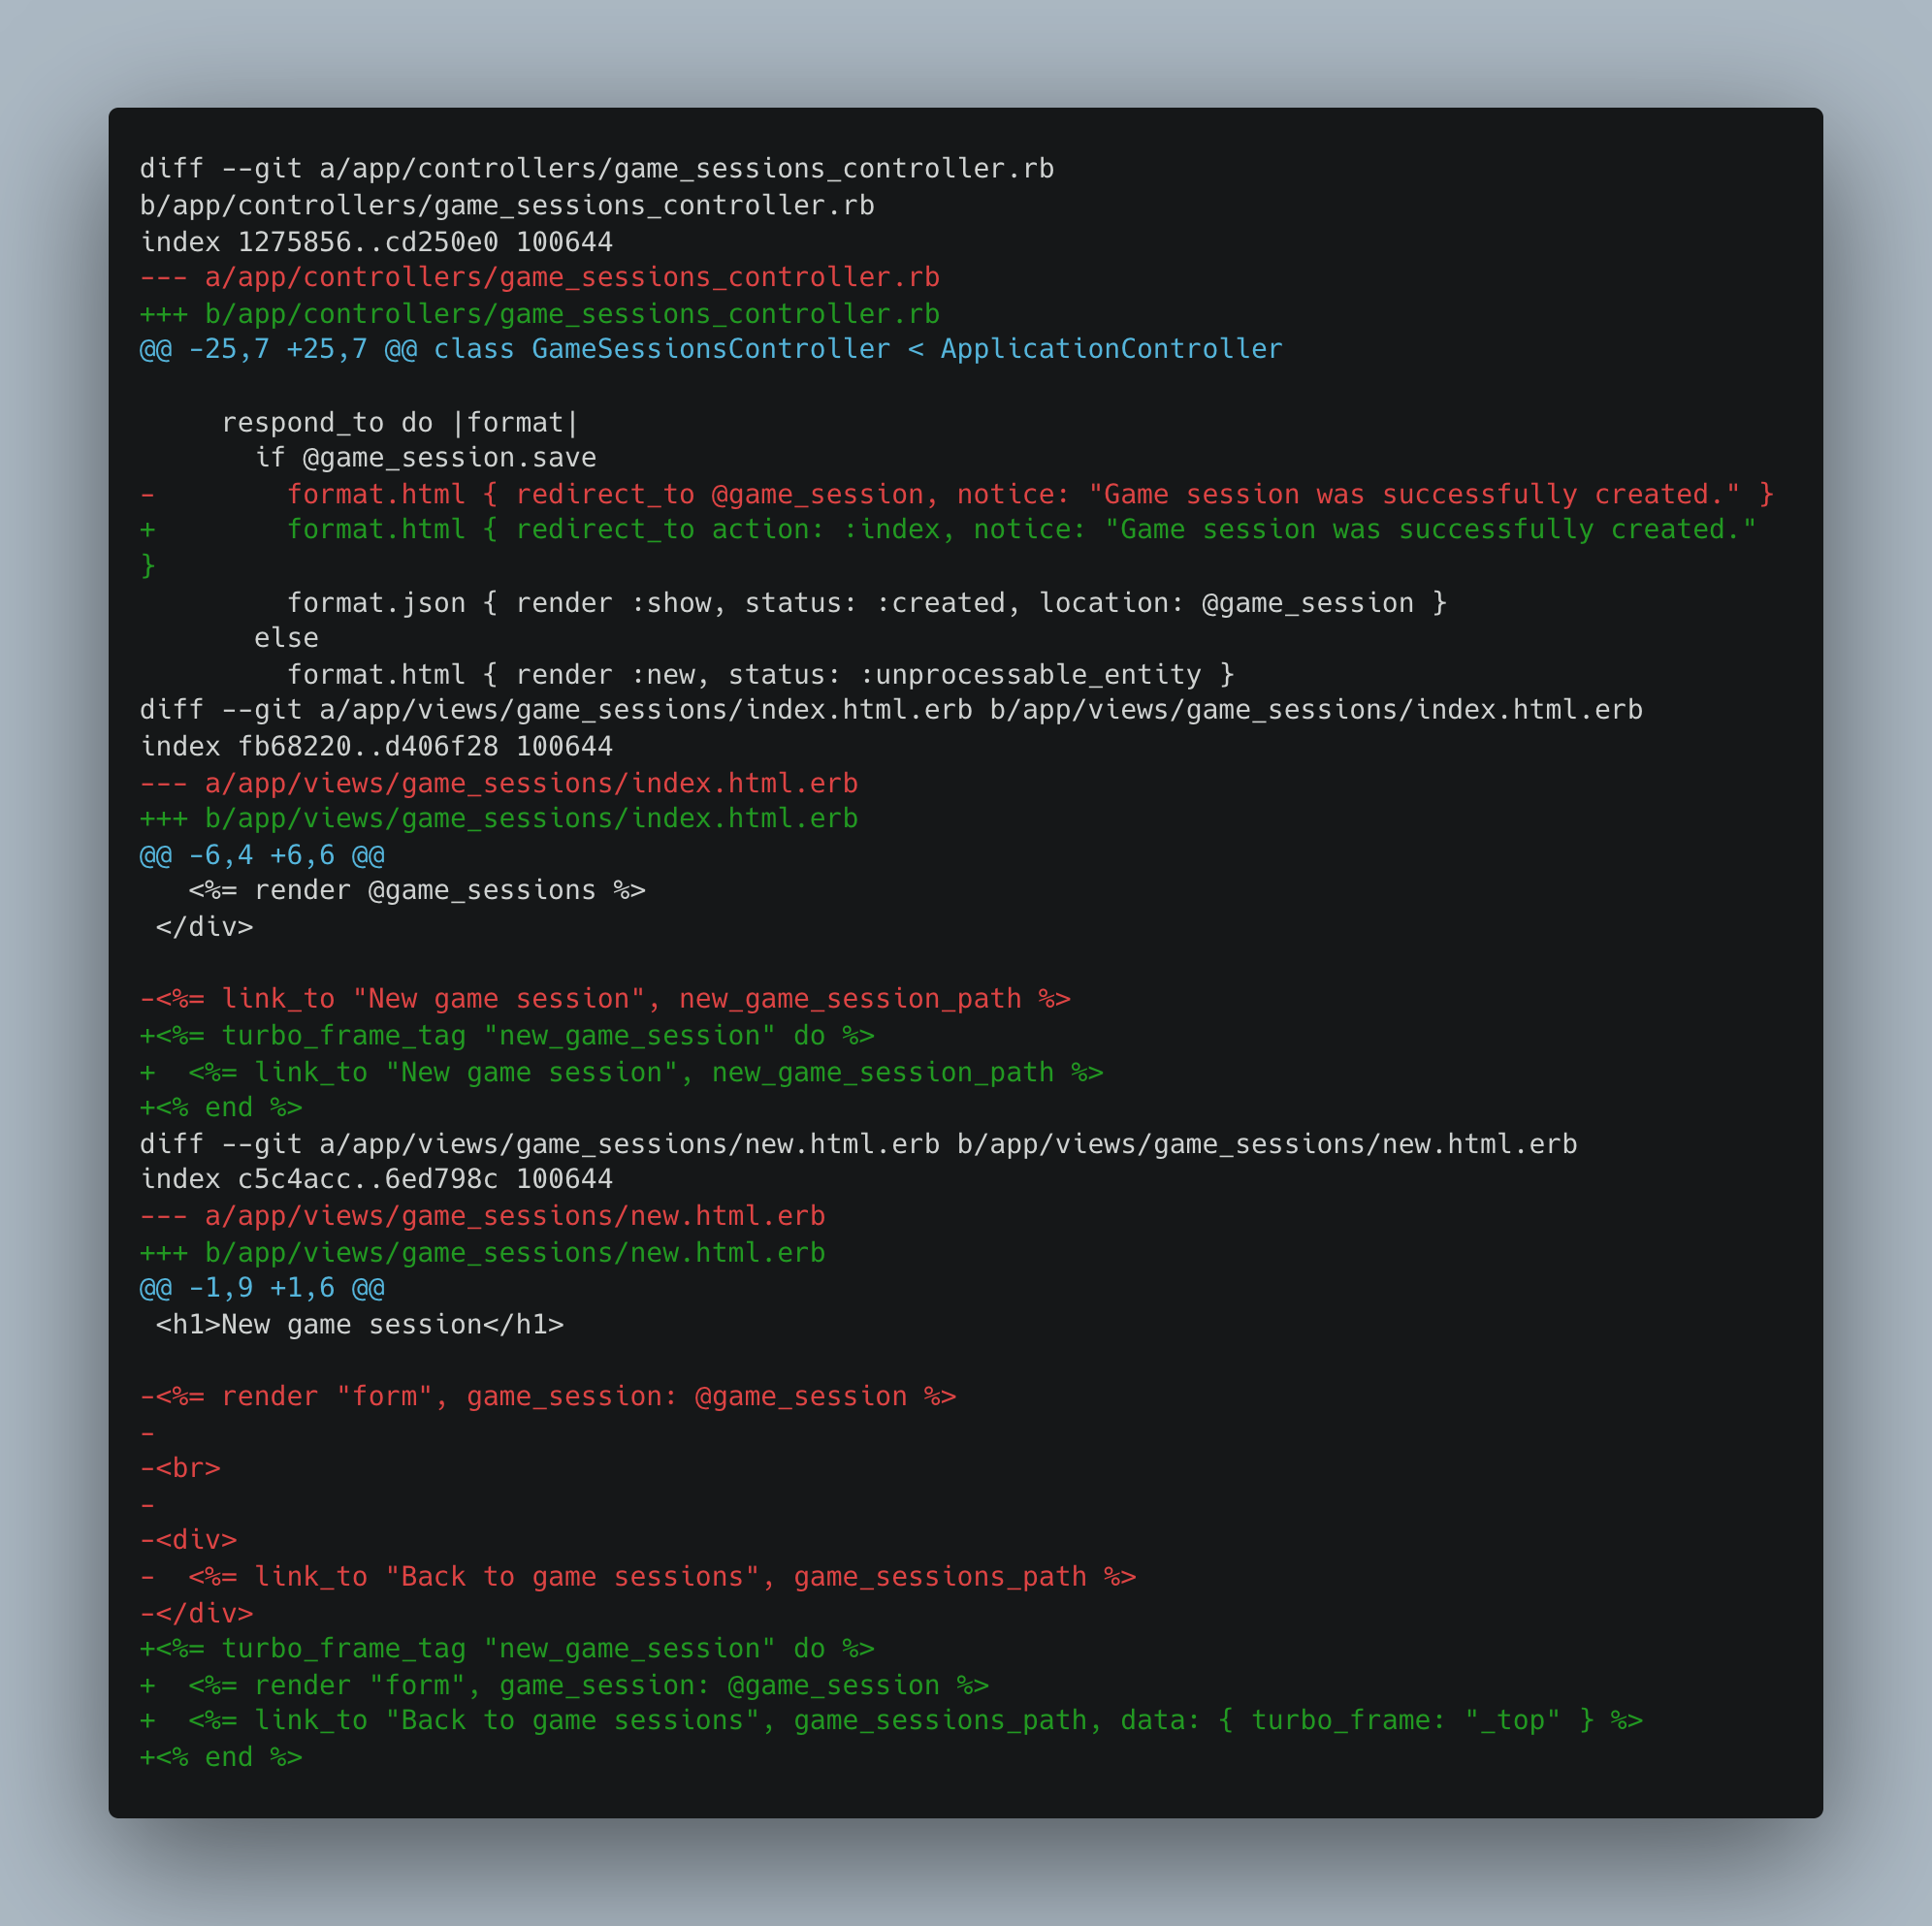
Let’s start by adding a TurboFrame to the game session’s index.html.erb, that way creating a new game session will not require redirecting to and from the new.html.erb form. For this, we will need to add a turbo_frame_tag to both pages and update the controller to redirect to the index action on creation.
Now, when you create a game session from /game_sessions the page renders several modalities without a full page reload. No javascript was required to toggle between these states, we did not need to toggle the visibility of the new form, and no API calls were required. This highlights the simplicity of HOTwire.
Let’s wrap these changes up and commit them to the repository with git commit -am “Add turboframe to game creation”.
Introducing TurboStream
You may notice a full-page reload is required to update the list of game sessions with the new game session. We discussed how to toggle page modalities easily with TurboFrames, but we will need to update the list of game sessions on index.html.erb in real-time. TurboStreams can be used to load game sessions in real-time without a full-page reload. They will show up a few more times and will play a key role in integrating with Webex.
They are about as easy as a TurboFrame to set up. Simply add a broadcast call to the model after a game session is created and then, connect to the view’s stream.
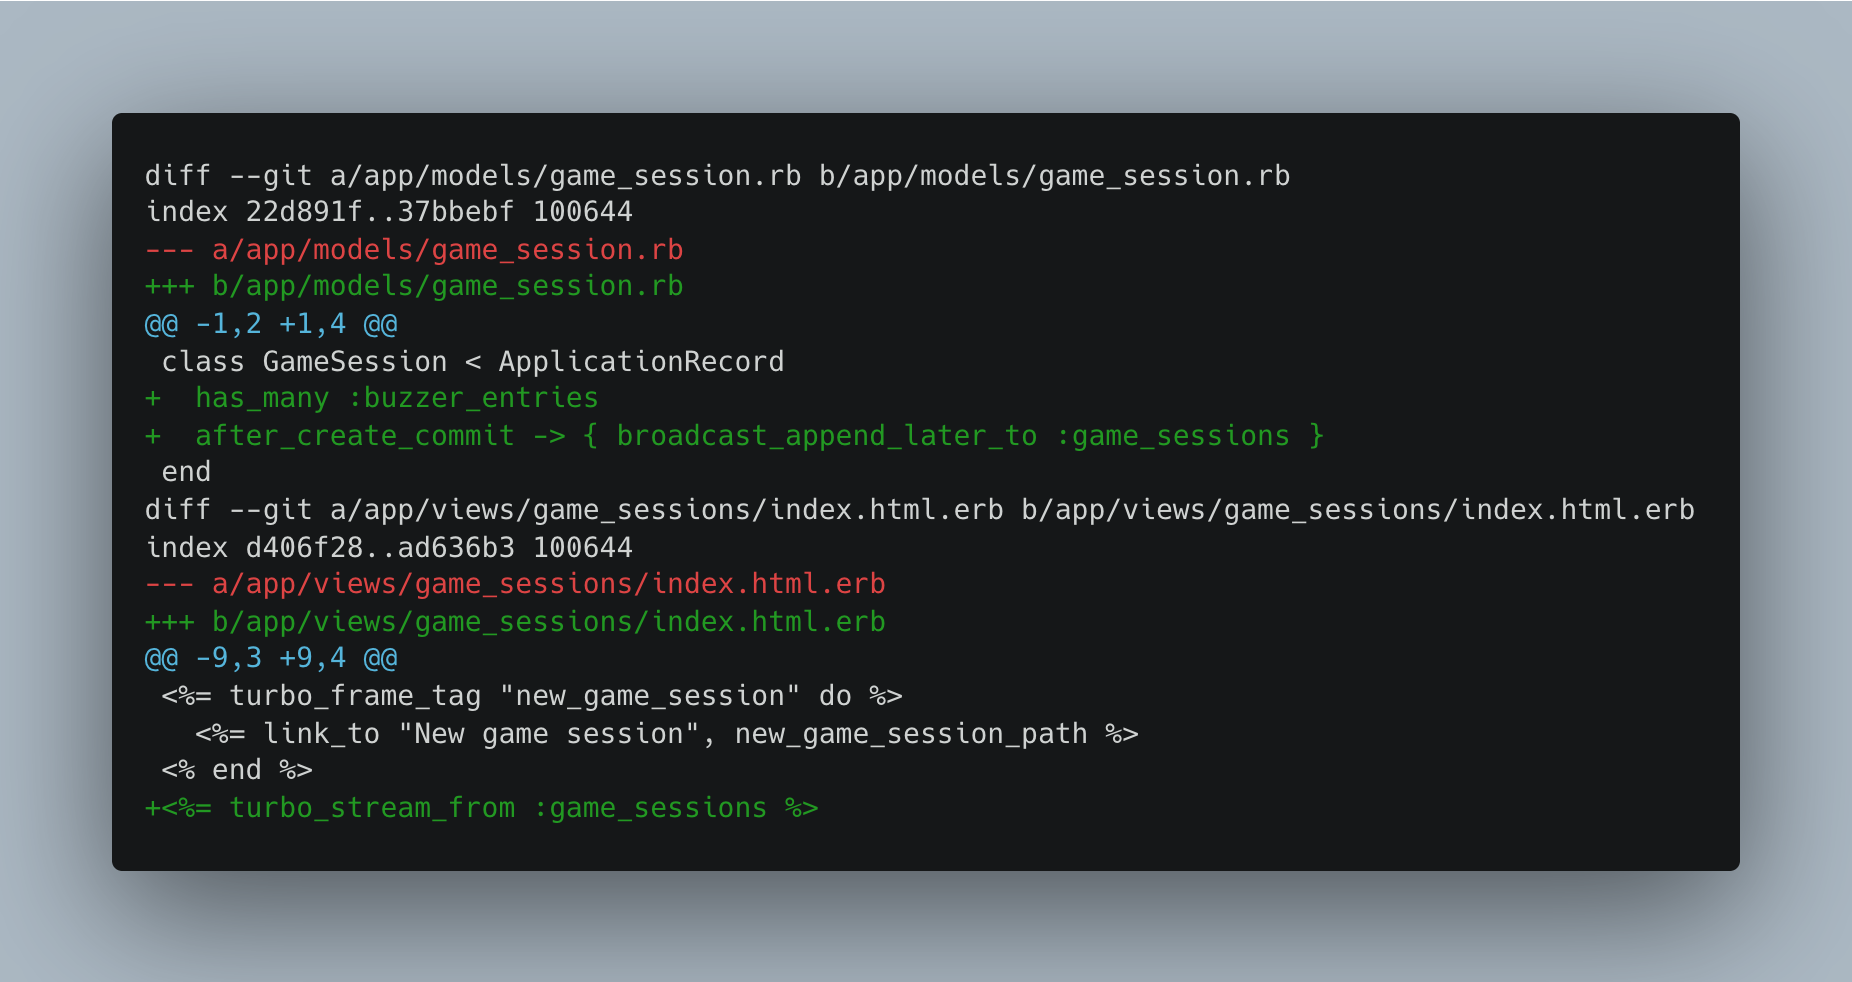
Now, whenever a new game session is created, it is appended to our list of rendered game sessions in the background. This flow no longer requires a lot of redirecting to perform CRUD operations improving the performance and responsiveness of the app.
Don’t forget to commit these changes git commit -am “Add turbostream for real-time updates”. With an understanding of TurboStreams, we can integrate with Webex.
Introducing Stimulus and Webex’s JavaScript API
With basic game session management for the host complete, we can focus on the individual game sessions and integrate our app with Webex. We will explore the use of Stimulus, a new addition to Rails that rounds out HOTwire. With Stimulus, we can sprinkle a small amount of JavaScript throughout our views that fire on standard DOM events like animations or DOM mutations. In a trigger, we will both call the Webex JavaScript API and return a host’s name and the “Open Together” feature to share our buzzer button with all attendees when the host selects a “Share” option.
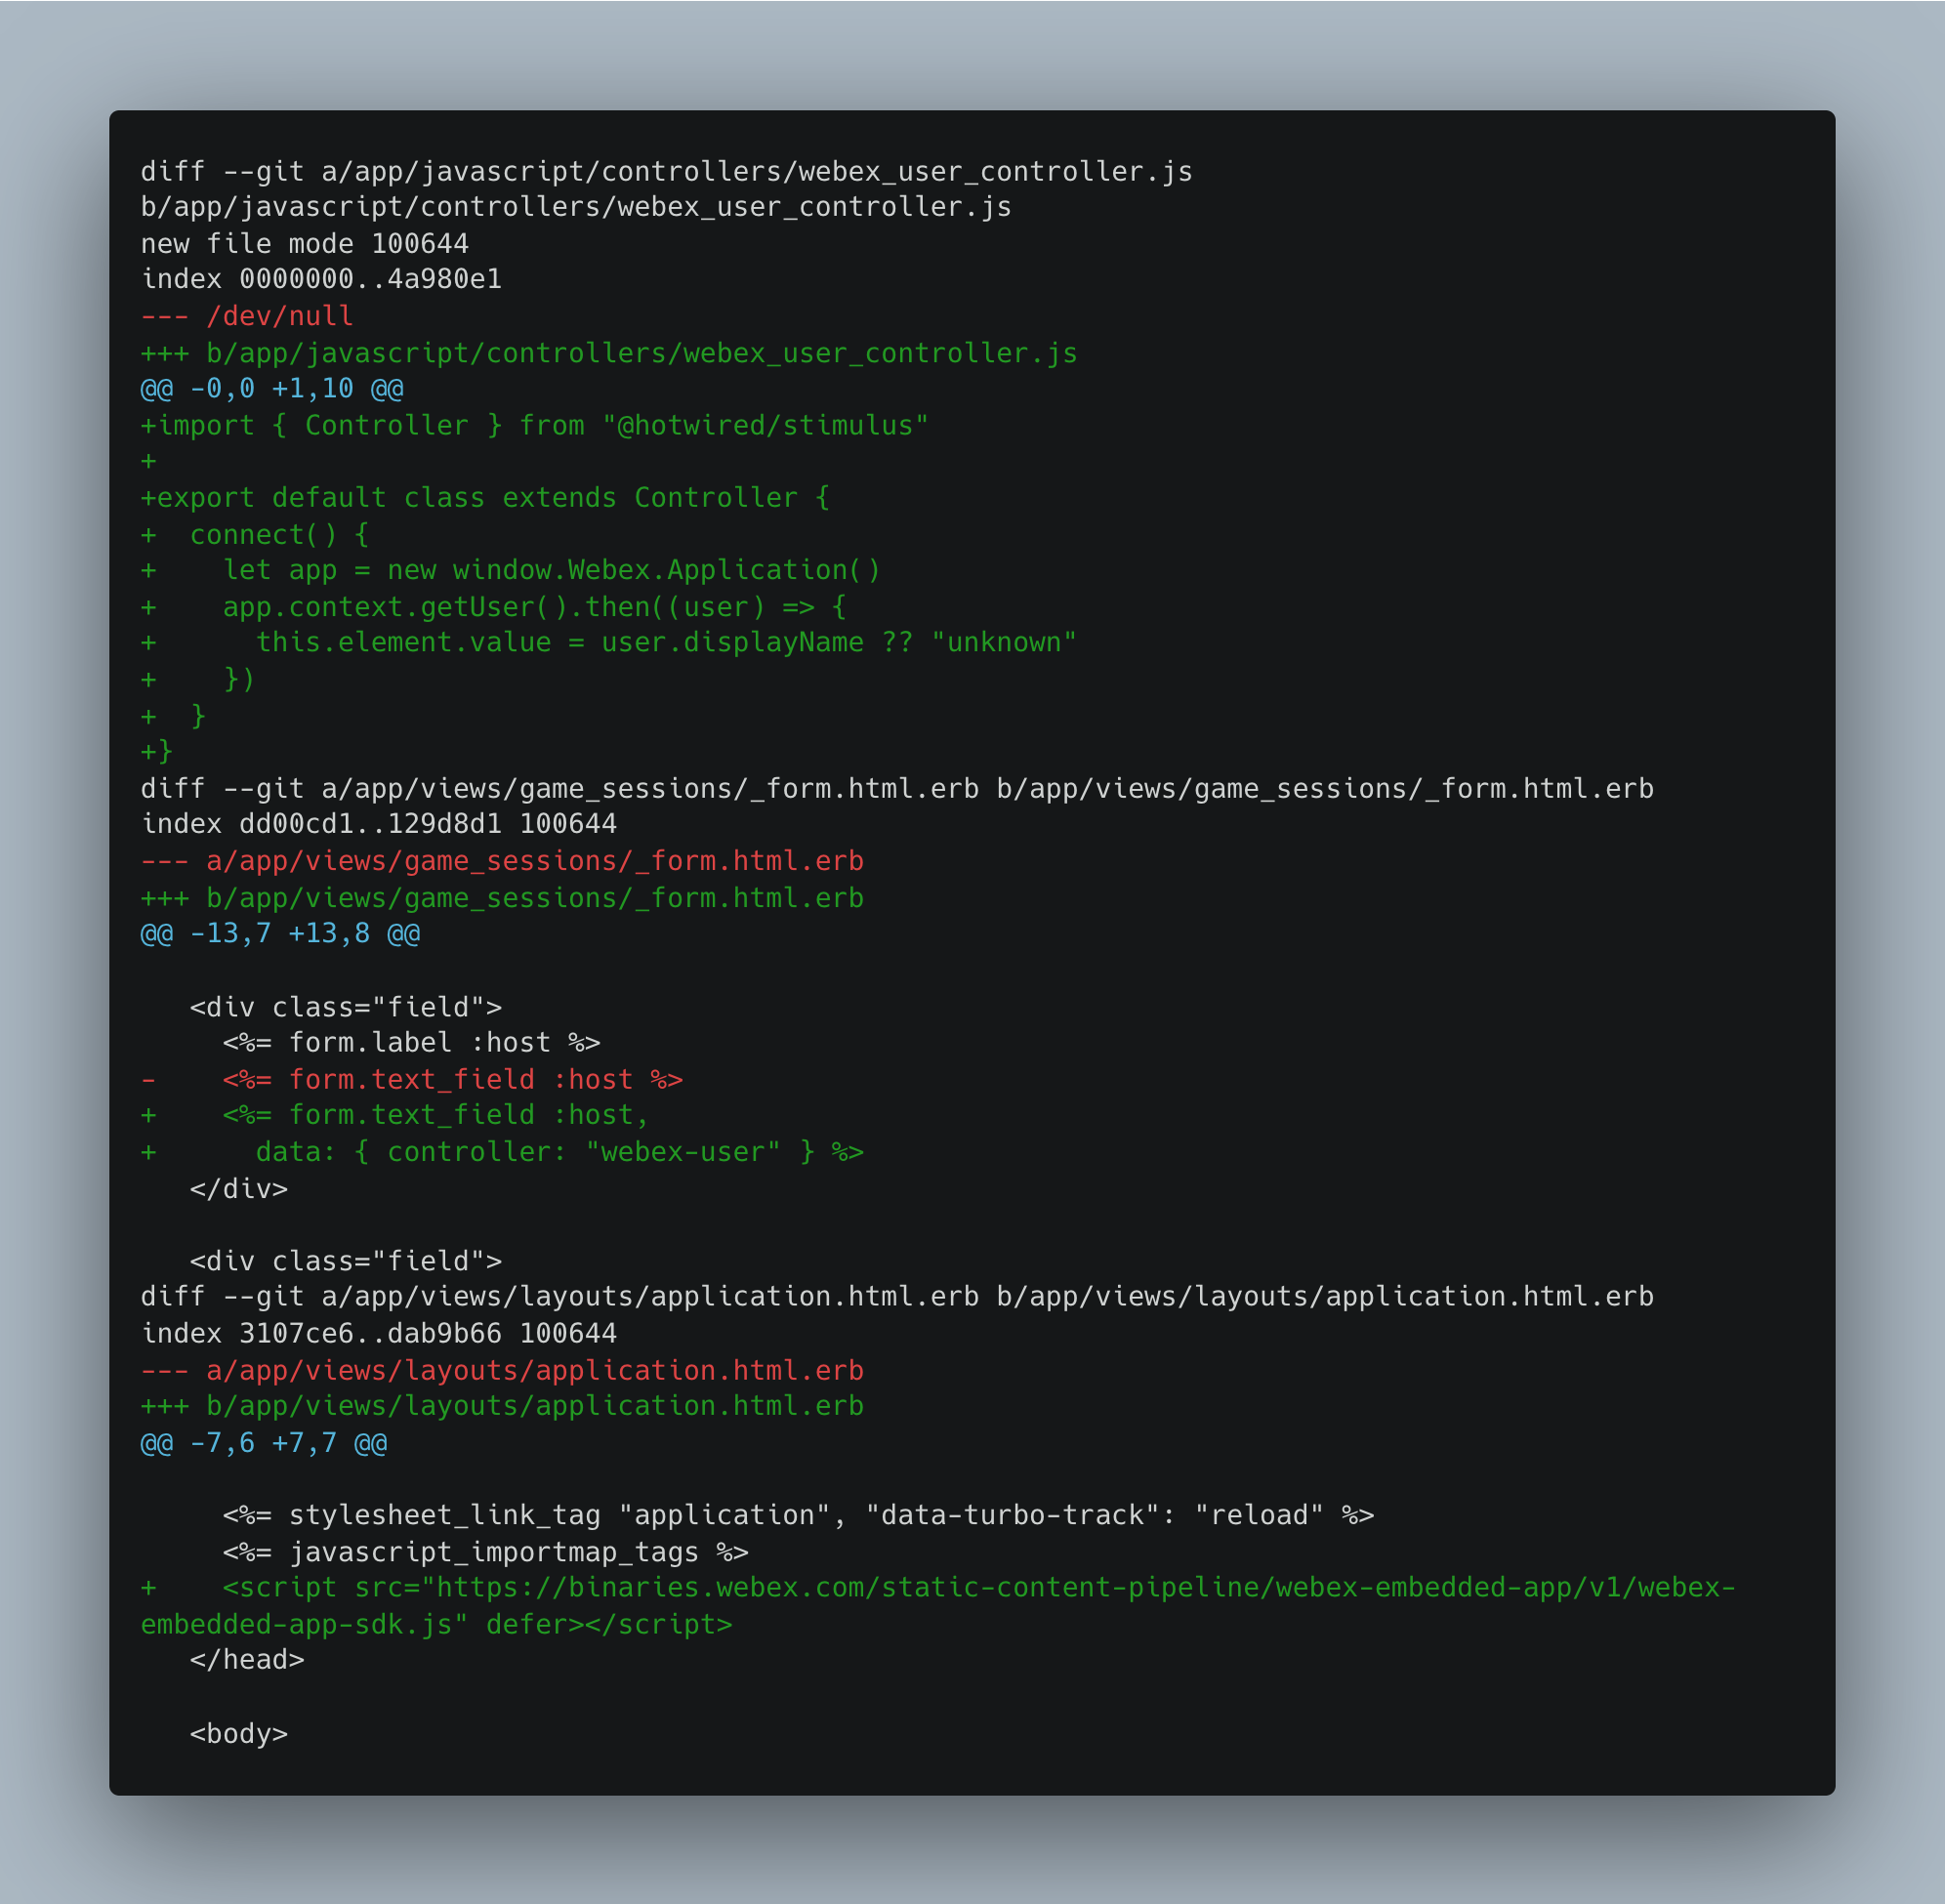
Add the Webex JavaScript API to our application.html.erb layout with the following line:
This script is all we need to start integrating with Webex. With Stimulus, request the host’s name before creating a game session. We need to create a new Stimulus controller to accomplish this:
touch ."/app/javascript/controllers/webex_user_controller.js
Decide which events should trigger in the controller and query for the host’s name. The Stimulus “connect” actions are well suited for this. Load the host’s name into an input when a Stimulus controller connects to it.
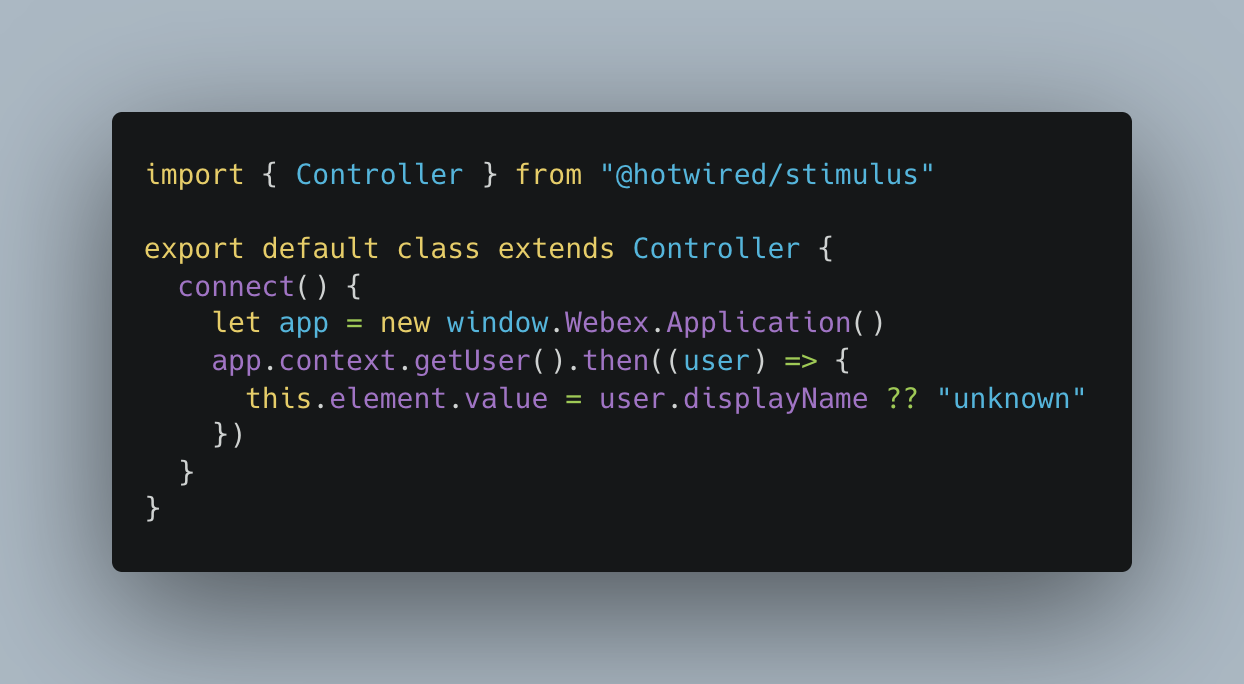
In the JavaScript controller, define a connect action. Then in the form, load the Webex data into the name input.
Stimulus and Webex’s JavaScript API lets us query for specific information from within Webex. Once a Stimulus controller is referenced in the partial whenever the form is rendered the connect function will trigger and the display name data will be set on the input.
Later in this tutorial, we will define an action that triggers on a click event.
With these fundamentals in place, we can apply the same patterns to the game session show view to complete the design mocks shared earlier. We will reuse the same pattern to render a list of buzzers on the game session show view and use a Stimulus action to trigger Webex’s “Open together” to share the buzzer view with all attendees in a Webex meeting.
Commit these changes, git commit -am “Add Webex API to our app”.
Building the Webex experience
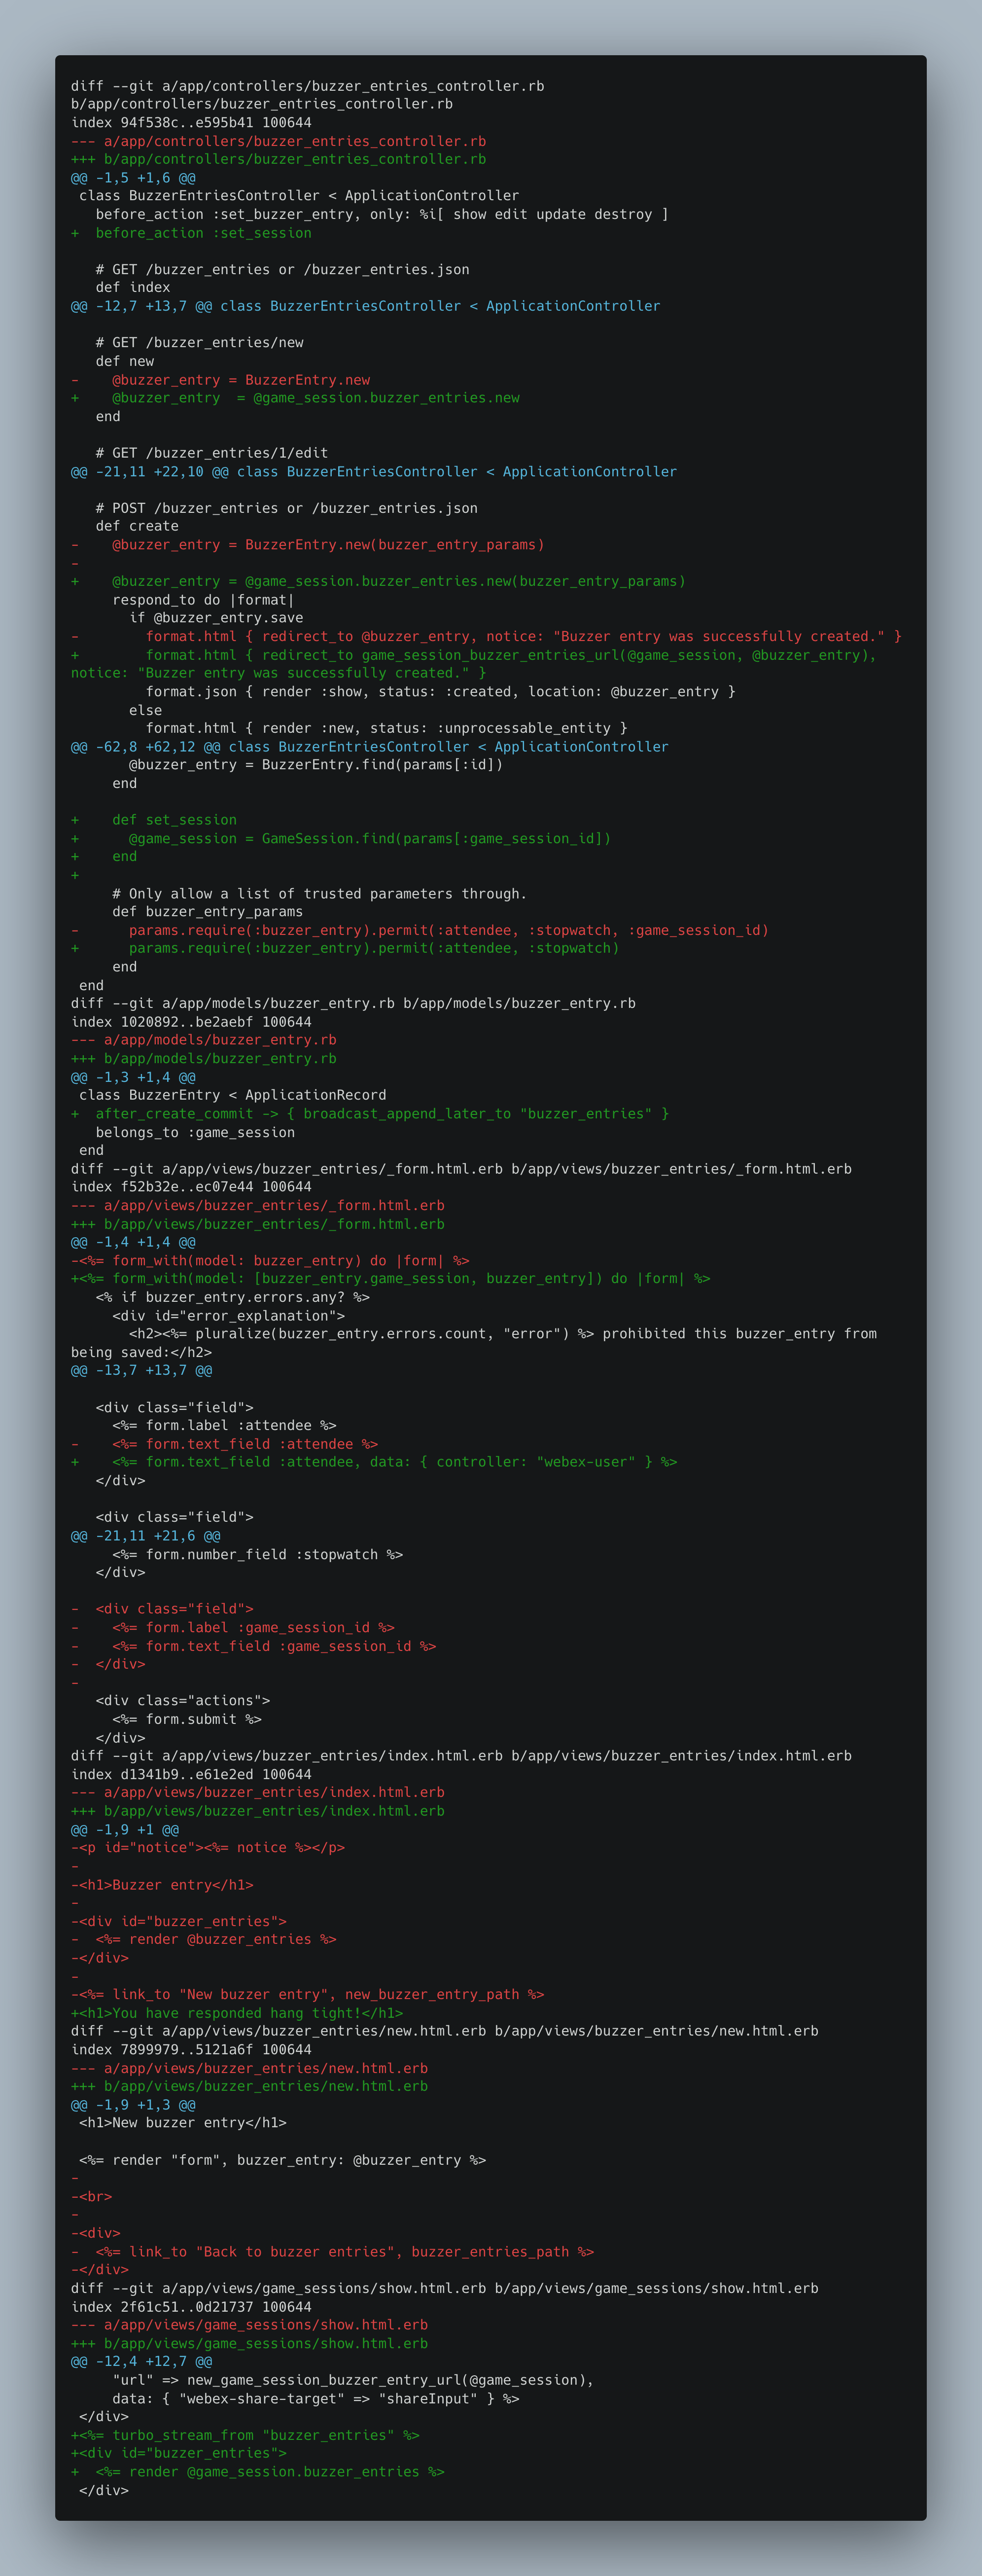
First up, we will display all the “buzzes” associated with a game session and connect them to a TurboStream for real-time updates. The goal will be to show a list of buzzer entries on the game session show view as attendees “buzz.”
Since the buzzer entries are nested under the game session namespace a few path tweaks are required. Remember to add an id to the buzzer partial view so that the TurboStream can update the list properly. Run these commands to set up the real-time updates for the game session:
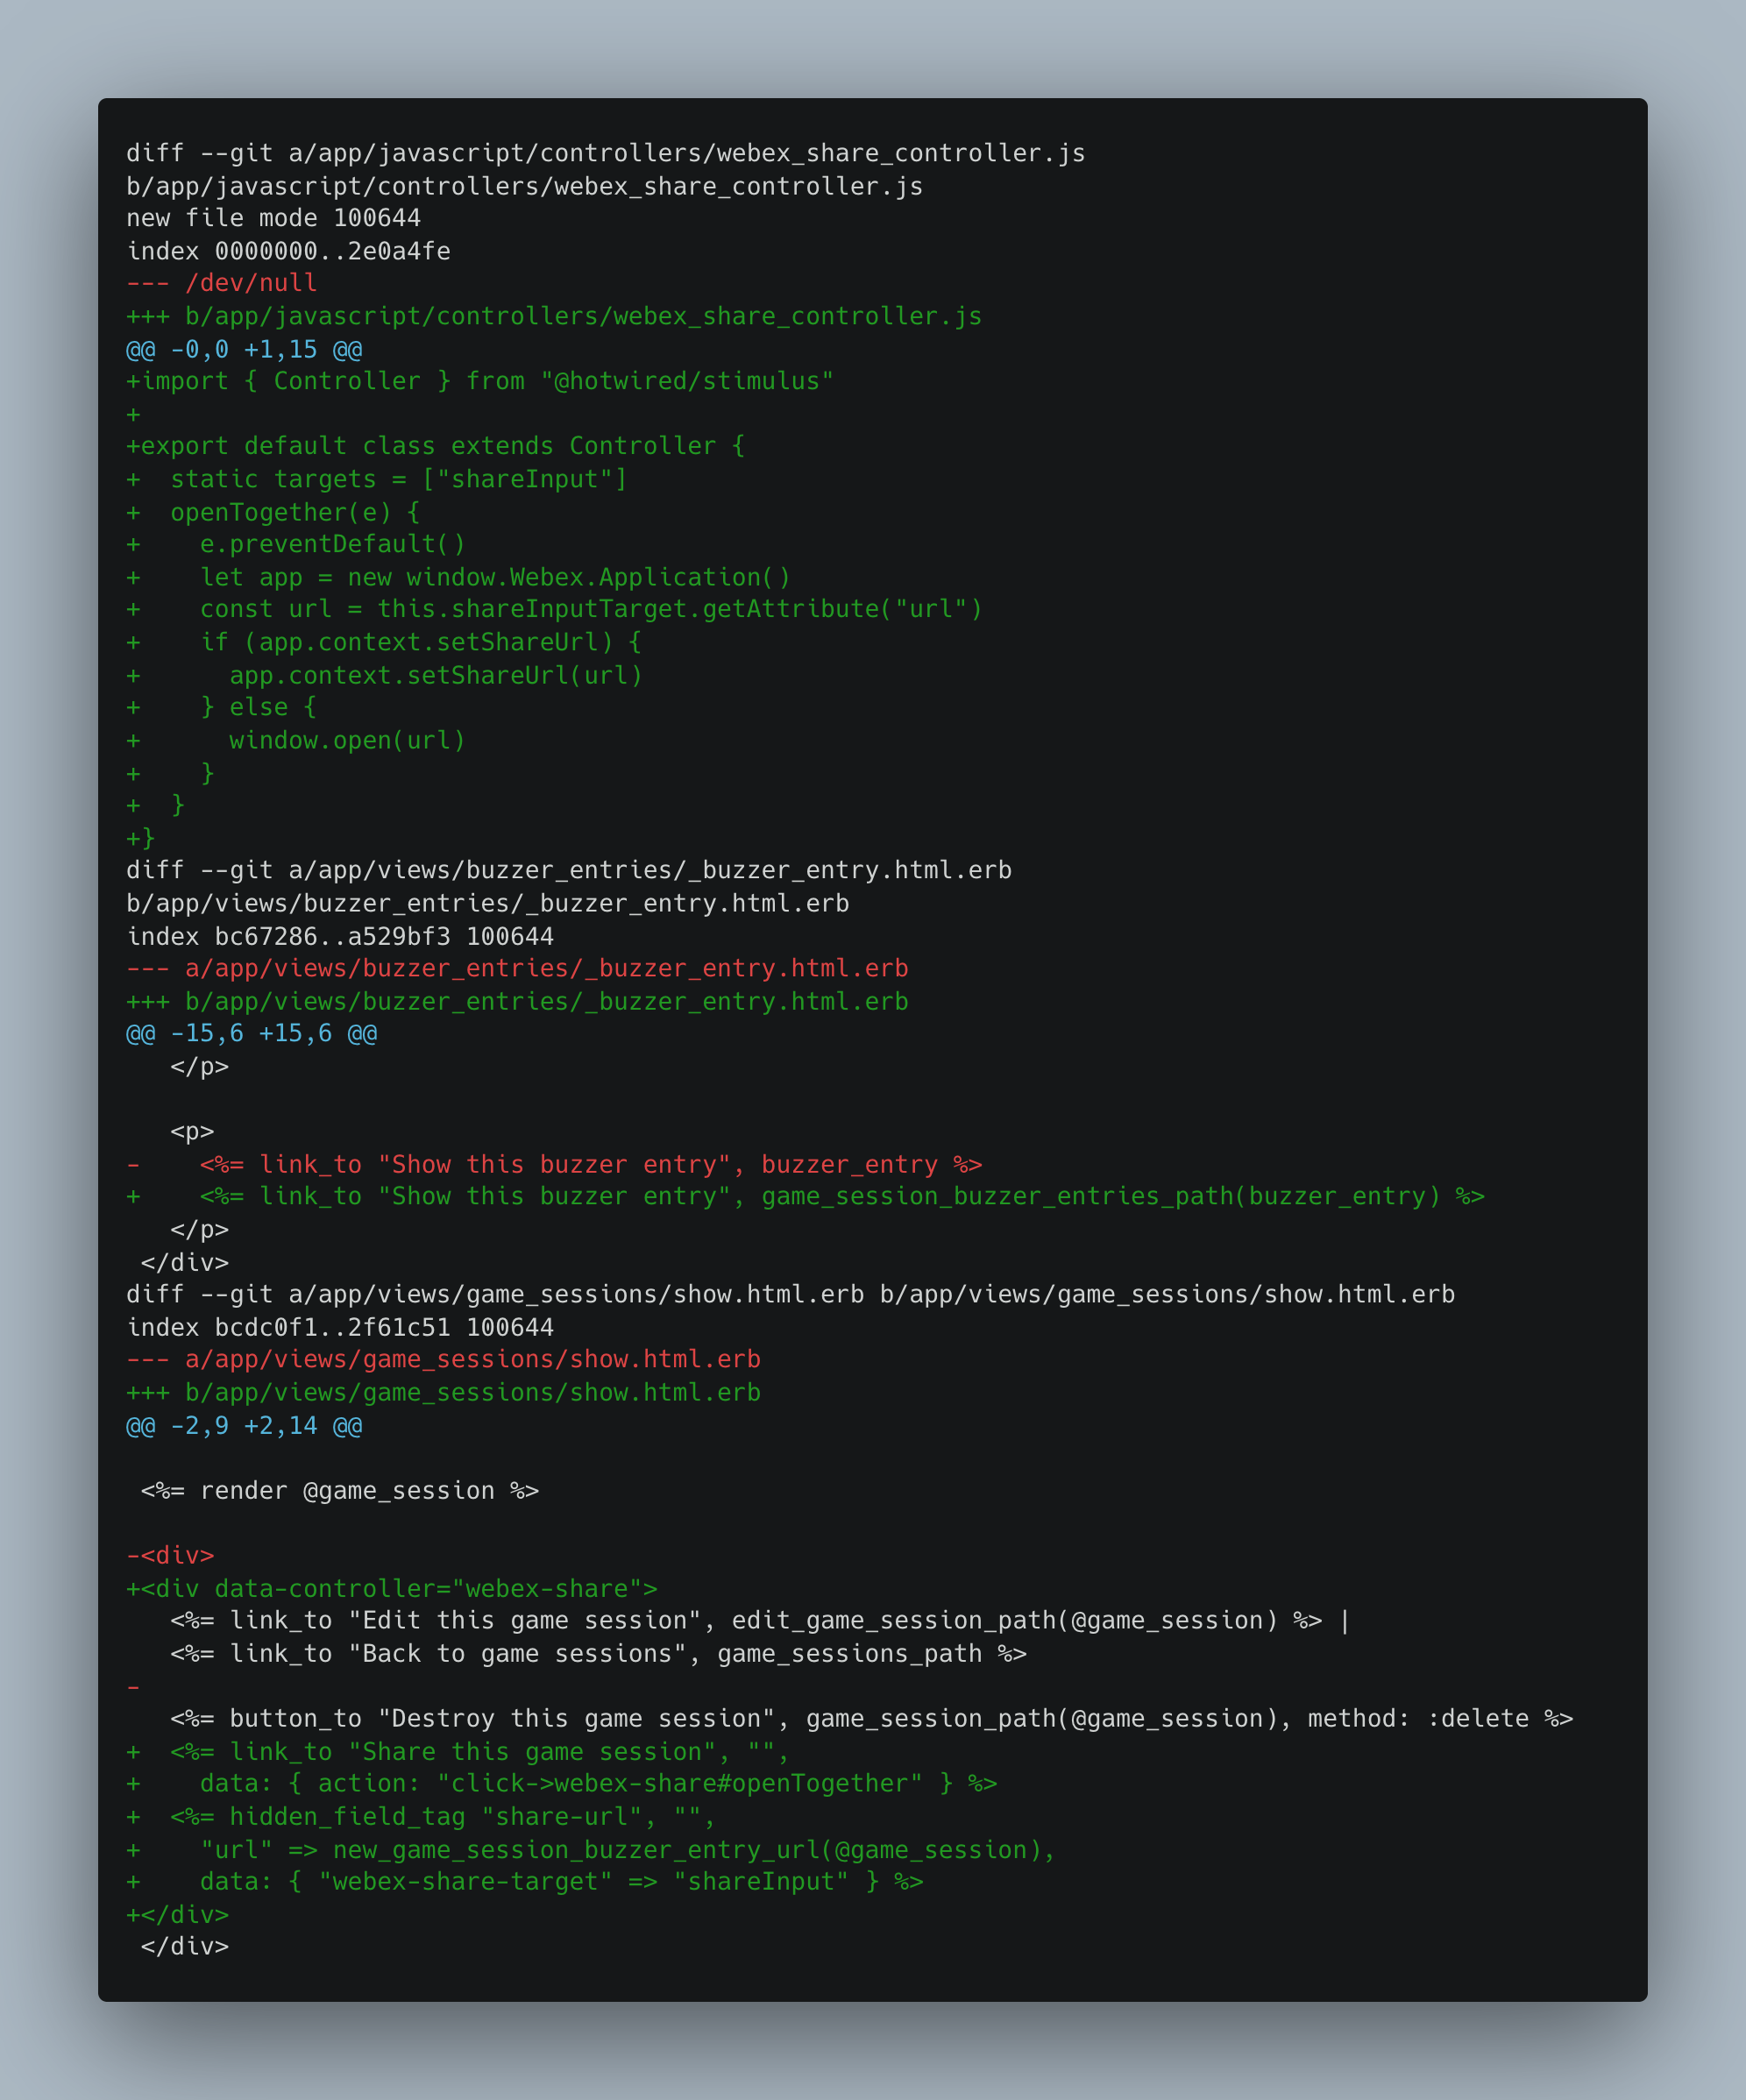
Second, create a Stimulus action that shares the new buzzer button view with attendees. When loaded in the Webex app platform a host simply presses “Share” on the game session view and all attendees will see a button to “Open together.” When they press “Open together” the buzzer entry new view will load. Note, you might want to open a new window when Webex is not detected for testing purposes.
This time, trigger the Stimulus action on a user click. There are a few gotchas to be aware of. First, make sure to review the name convention documentation for Stimulus controllers and targets. Also, use kabob-case to reference the controller and camelCase to name an input. Lastly, wrap a link_to and a hidden_input with a div that specifies the data-controller so that multiple elements are accessible in the Stimulus controller.
Check-in these changes, git commit -am “Adds the main game experience”.
The “Open together” feature is key to building a connected experience in Webex. After calling setShareUrl a new button will display “Open together” in the Webex meeting for all attendees. When the attendees press the new button the shared page from our app displays in the Webex side panel, connecting the host and attendees. We see a lot of potential for this feature.
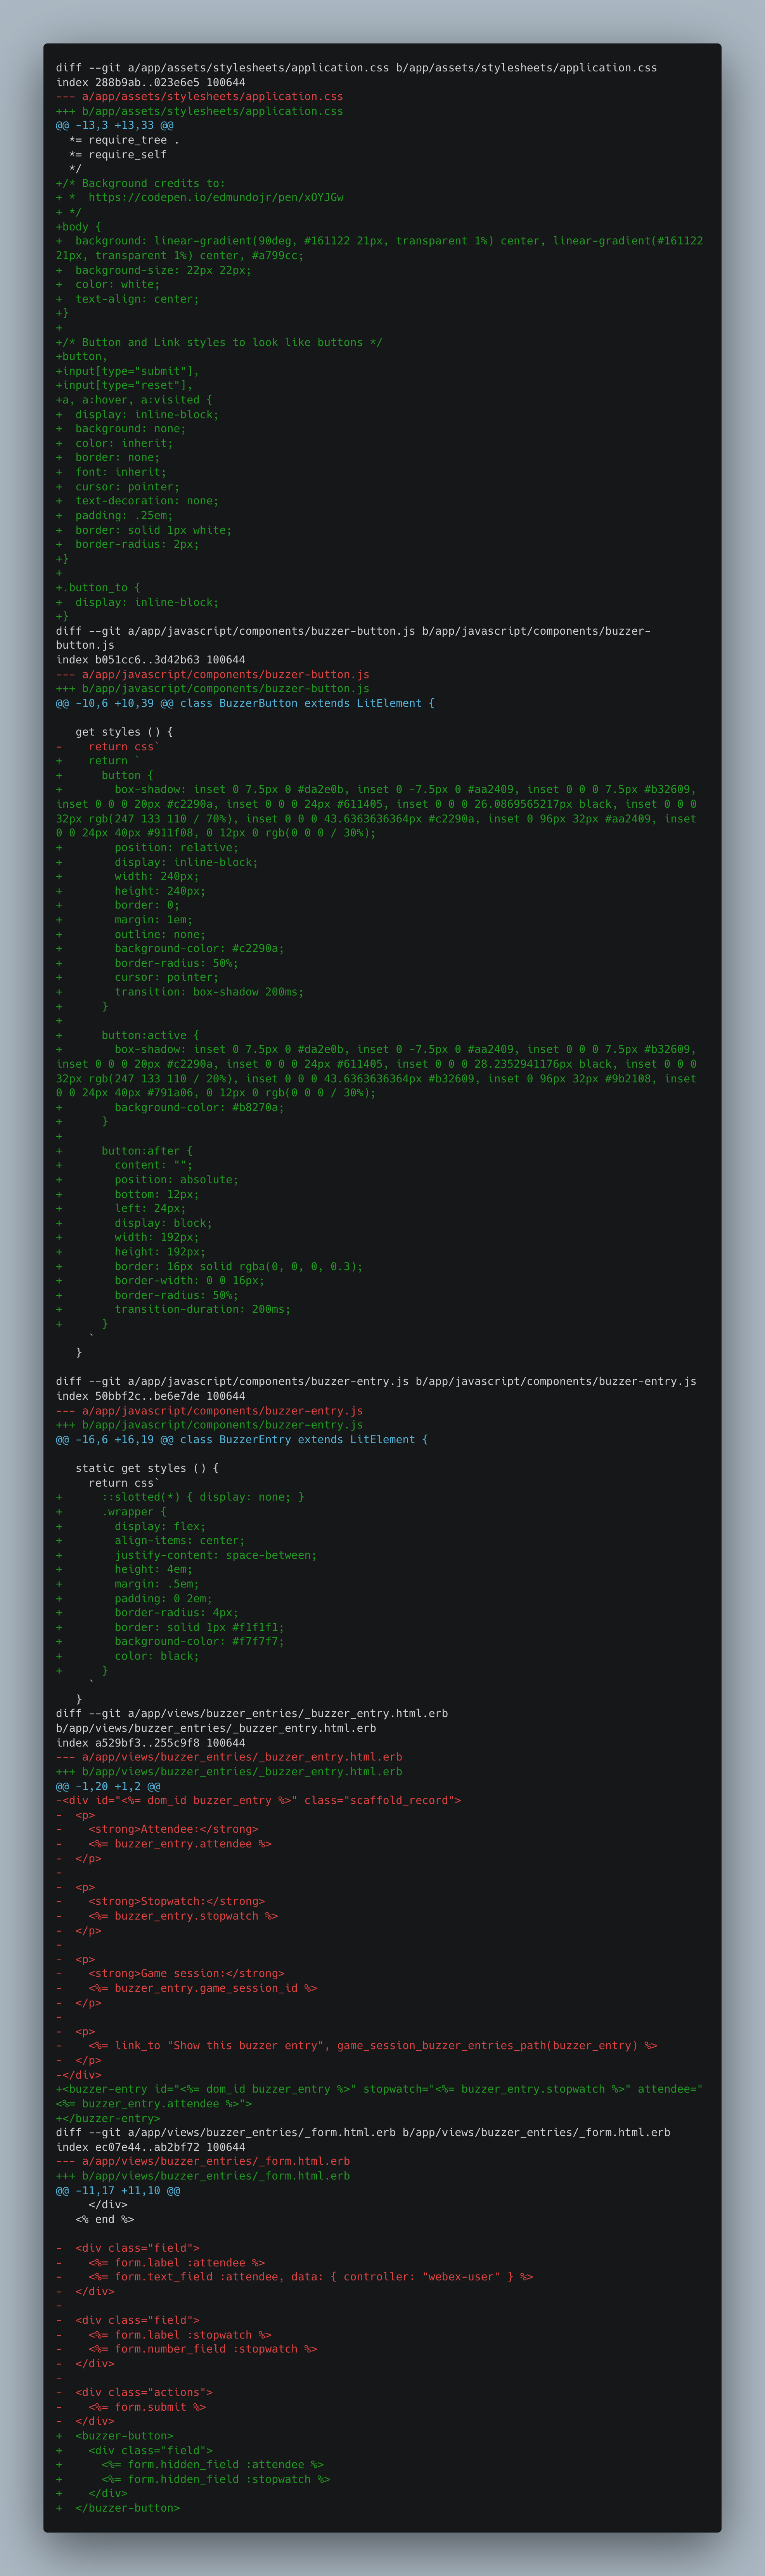
Styling and Web Components
At this point, all the Webex features are in place except styling.
We will use LitElement to encapsulate styles in the Shadow DOM for a few important components. The buzzer-button component will style the button input page and the buzzer-entry will contain the style for the list of buzzer entries.
To store these new components, create a new directory called components.
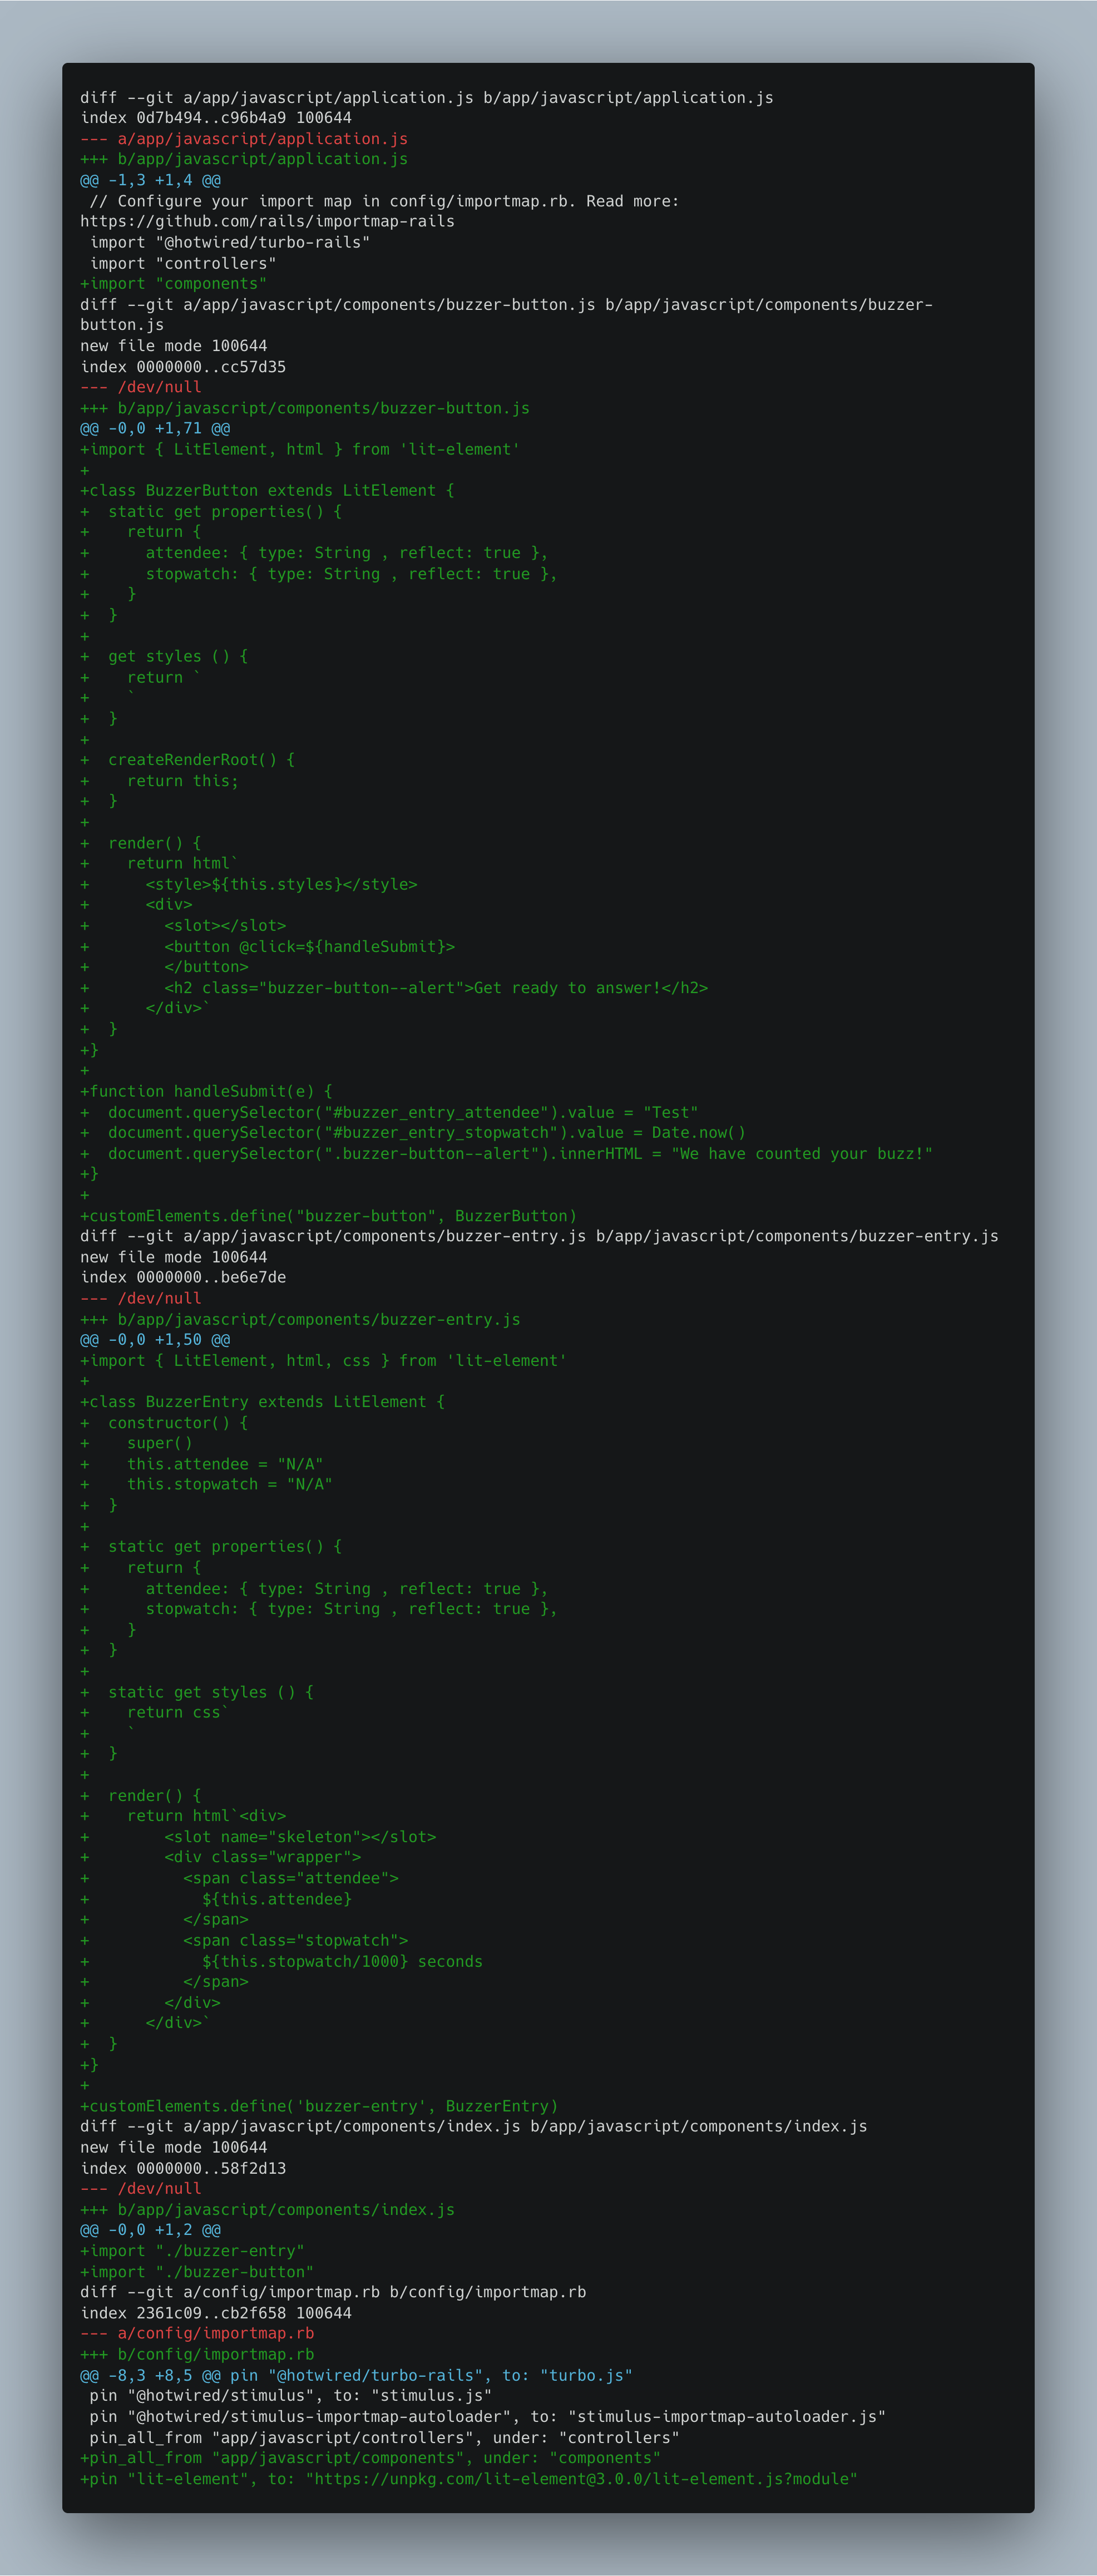
Then, create two new web components.
We will jump ahead and provide you with some predefined styles for each of these components and a few global styles to bootstrap the app. However, the sky’s the limit here. We encourage you to clone our Github repository to kick start your app.
To test locally with rails start. This app should have all the key features to integrate seamlessly with a Webex meeting. Our last step is to host the app on Heroku and submit it to the Webex store portal for review and listing.
Here are a few screenshots of what we have built.
Deploy and submit
That app is in a great state to deploy to heroku and submit to the Webex app portal.
Before deploying, review the Heroku Ruby on Rails setup instructions.
Once the setup is complete, deploy the app to Heroku with the below:
git push heroku main
Get the URL for the app with, heroku info -s
Use this URL when submitting the app with the Webex app portal.
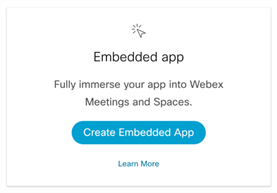
Now, select “Create Embedded App.”
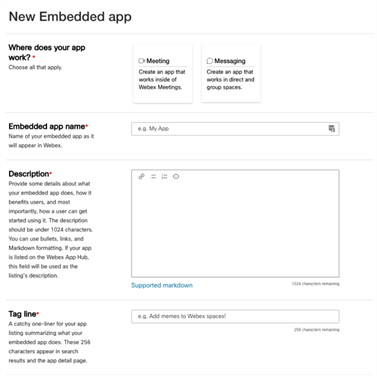
And fill out your app details.
Finally, submit your app for review.
Conclusion
In this article, we walked through the steps to build a full-featured Webex app integration. We used TurboStreams and the “Open together” API to connect the host with the attendees. We reduced the number of moving parts by building our app with the latest modern Ruby on Rails 7.0 features. Your team has all that it needs to build exciting hybrid experiences for Webex’s Embedded App framework. We hope that this tutorial has helped and are excited to see what you come up with.
Feel free to connect with us and share your experience at geeks@polleverywhere.com. For more behind-the-scenes systems, processes, and techniques that power Poll Everywhere, check out our Engineering blog.
This blog was originally posted on Webex’s Developer Blog. Check out the original post here.